Connect To A Broker Or A Data Provider
Both live data modes allow connecting to multiple platforms (depending on the platforms available on your licenses).
To connect to any given platform or API select any of the live run modes. Make sure to tick the recording check boxes if you want to record your data and orders for later analysis using the Replay mode.
To connect Bookmap to your broker or data provider, follow these steps:
- From the Bookmap main window, click Connections >> Configure.
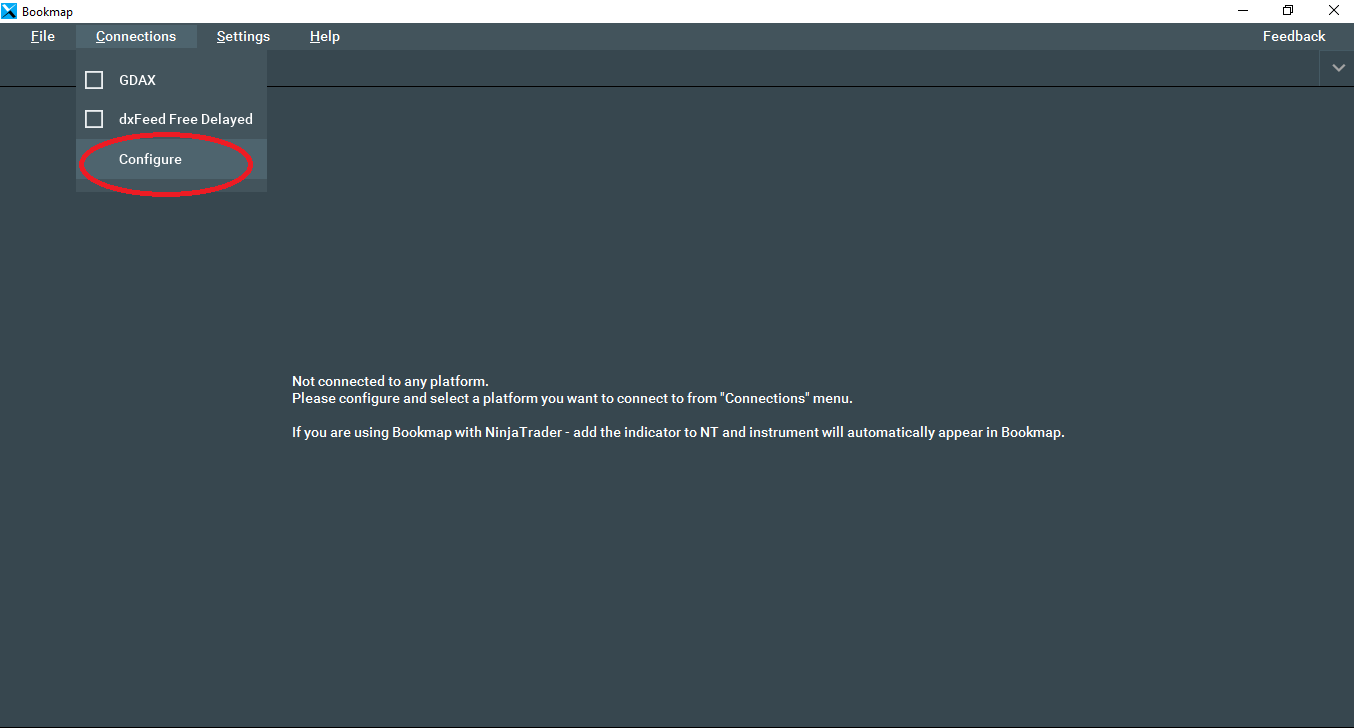
- In the configuration window, select the platform you want to add and use the relevant credentials. If the credentials are for a demo account, make sure to tick the demo account check box. Finally, click Add Connection.
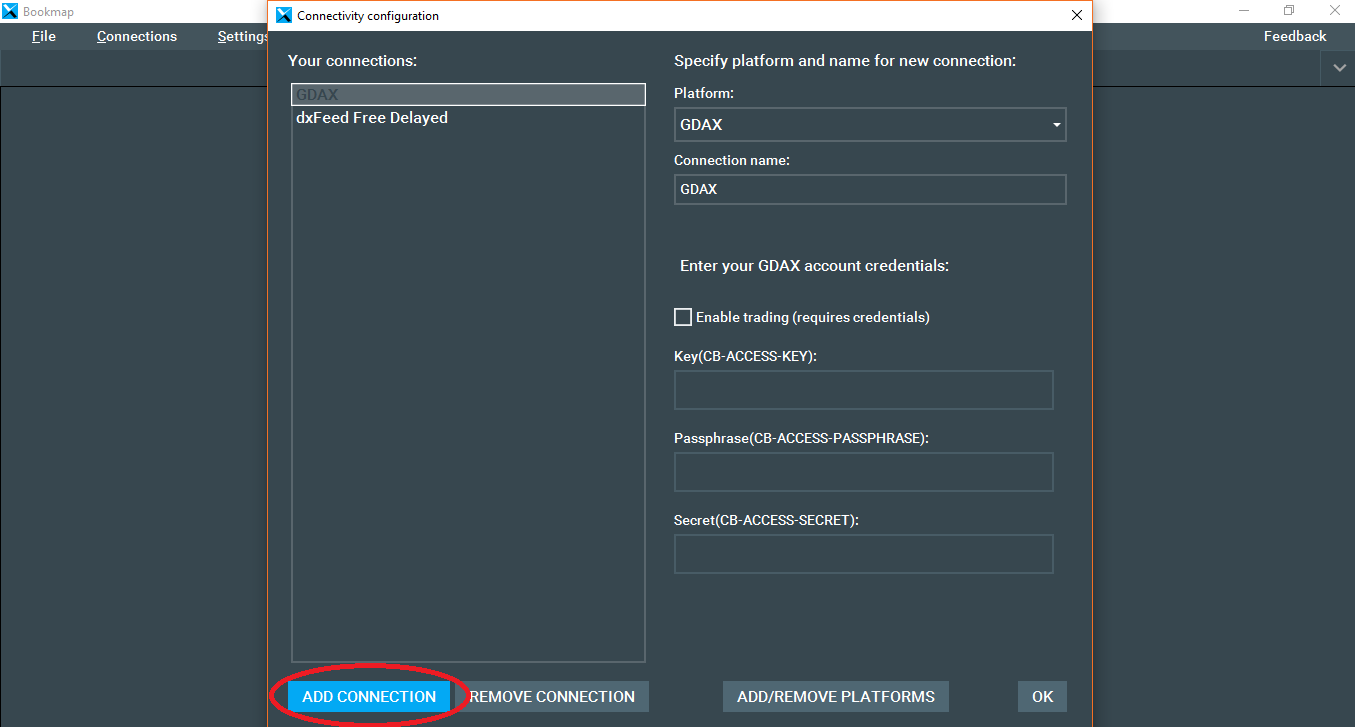
- Next, click on the Connections tab and select the connections you want to activate. Then you can subscribe to any of the instruments available through your active connections.
Note: if you want to add a connection to a crypto exchange that is not shown in the platforms list, you need to install the connection first via Settings >> Manage Plugin. See Section 2.6. Install Bookmap Connect Adapters.
All added connections will be kept in the configuration until removed by the user so the process of adding and activating a connection does not have to be repeated in subsequent Bookmap sessions.
Connect to Ninja
Connecting to Ninja as an indicator is somewhat different. Once you have Ninja Trader and Bookmap already installed and connected to the live markets, open Ninja Trader and Bookmap.
- In the Ninja Trader Control Center go to Tools and import Ninja Script.
- On your local drive, find Bookmap in the C drive. It is located in C:\Program Files\Bookmap\NT
- Then, choose Bookmap Indicator V8 for Ninja 8 and open it: BookMapIndicator.v8 for Ninja 8 and BookMapIndicator for Ninja 7
- Now, open a new chart and add Bookmap as an indicator. Go to: New and Chart. Then, select the indicator you need and click OK in the chart.
For Bookmap 7.0(starting from build 86) and greater:
- Open Bookmap, go to Connections, and connect to Ninja Trader.
- In the newly opened chart in NinjaTrader click on the indicators icon from the available indicator scroll-down menu then double-click on Bookmap xRay and click OK. Only one indicator should be selected: Bookmap xRay.
- In the alert window in Bookmap select the appropriate account.
For Bookmap 7.0 up to the build 85:
Bookmap opens up and prompts you to select an account. Select one and click OK. It will take a moment for the data to populate. The market must be open for Bookmap to connect to your live data stream. Note: if the markets are closed, Bookmap market data will not be available.
Now, click on the instrument title to open the Bookmap chart. There is no need to click on the instrument; it will open automatically. You're ready to go!
You can also watch the instructional videos to learn:
- How to connect to Bookmap 7.0 up to the build 85 to Ninja 8.
- How to connect to Bookmap 7.0 starting from the build 86, Bookmap 7.1 and greater.
If you have issues with connecting NinjaTrader to Bookmap or you don’t receive data , please follow the next steps:
- Disconnect NinjaTrader from all the providers and close all the charts.
- Go to the Control Center (Ninja Menu) ->Tools -> Remove NinjaScript/Assembly and remove Bookmap Indicators.
- Restart NinjaTrader.
- Go to the Control Center ->Tools ->Import Ninja Script for Bookmap again.
- Open a new chart with a non-expired instrument, make sure that data is received.
- Open Bookmap and go to Connections ->Ninja trader
- Add Bookmap Indicator to the chart in NinjaTrader.
- In the alert window in Bookmap select the appropriate account.
- If it doesn’t help, please contact support@bookmap.com and request a remote session.
Configure Your Ninja Trader Connection
Initial setup:
- In Bookmap, connect to Ninja Trader under 'Connections -> Ninja Trader'.
- Import the Bookmap indicator in Ninja Trader by going to 'Tools -> Import -> NinjaScript Add-On...' and selecting 'C:\Bookmap\NT\BookmapNinjaIndicator.zip'.
- Restart Ninja Trader and connect to your data provider.
- Open a chart in Ninja Trader and after clicking the 'Indicators' icon, load the indicator named 'Bookmap'. This has to be done for every chart you want to open in Bookmap.
After the initial setup, when you want to connect:
- In Bookmap, connect to Ninja Trader under 'Connections -> Ninja Trader'.
- Select the chart in Ninja Trader and press F5 (or right click and select 'Reload NinjaScript').
At this point, Bookmap will automatically open the instrument. If nothing happens, make sure the chart has loaded the 'Bookmap' indicator.
Note: The old 'BookMap xRay' indicator is now discontinued. If you have it installed, please remove and replace it with the latest version.
For more information, see this forum topic.
Connect To dxFeed US Stocks and dxFeed CME
Watch the instructional video to learn:
- How to connect to Bookmap to dxFeed.
Connect Rithmic
Watch the instructional video to learn:
- How to connect to Bookmap to Rithmic.
Connect IQFeed
Watch the instructional video to learn:
- How to connect to Bookmap to IQFeed.
Connect To TradeStation
You can connect Bookmap to dxFeed’s US stocks data and place equity trades through Bookmap to your TradeStation account.
Follow these steps to connect Bookmap to TradeStation:
- Subscribe to Bookmap Global Plus, which supports one-click trading. You will need to install Bookmap version 7.1 or higher.
- Subscribe to dxFeed’s US equities data. You will need the Nasdaq or EDGX data package or the bundle of both.
- Connect Bookmap to dxFeed’s US equities data and to TradeStation from the connection menu. Note that for TradeStation, you will also need to authenticate your identity in the TradeStation authentication window. You will be directed to the authentication page once you connect Bookmap to TradeStation.
- Once authenticated, your connection will be established. Select both dxFeed US equities and TradeStation from the configured connection, and you are ready to go. Any US equity symbol you subscribed to will be tradable on Bookmap through your TradeStation account.
You can also watch the instructional videos to see how to connect Bookmap to TradeStation.
Connect To R|Trader Pro
Follow these steps to connect Bookmap to R|Trader Pro:
- Make sure you have the latest version of R|Trader Pro installed. To download the latest version go to https://rithmic.com/rtraderpro.msi
- Start R|Trader Pro. On the R|Trader Pro launch pad click Allow Plug-ins.
- Enter your credentials (in two places) and press the Log in button.
- Make sure you have Bookmap 7.1 b37 or later version installed. Launch Bookmap and press the Connection ⟶ Configure
- In Bookmap configuration window, click on the Add Connection button and select Rithmic.
- Select the Plugin Mode checkbox and enter your R|Trader Pro credentials. Click Ok.
- Tick the Rithmic connection under the Connection menu and click the + button to subscribe to your instrument of choice.
Rithmic Troubleshooting Guide
Rithmic Connection Issues: Invalid Credentials
While configuring connectivity in Bookmap, pay attention to the Rithmic System/Gateway combination. If you are not sure what Gateway should be set to, use the default settings (however it would be best to use the closest gateway).
If you are using R-Trader and the Plugin mode please make sure that you have entered the same credentials for both connections.
Rithmic Inconsistent MBO Data Received
It is a minor issue caused by inconsistent MBO data. Follow the steps displayed in the window.
You can reasonably safely continue, just press Continue, and when it pops up again check Ignore further minor errors and press Continue again. It is not dangerous and in this specific case will only affect MBO-based indicators.
Data Latency Spike Detected
This message appears when the data is delayed in a specific time interval. It could be caused by the low speed of the Internet connection or at the data provider side.
Regardless of where data is delayed (on a Rithmic server or while being transmitted to the client), we try to detect the fact that server-side timestamps start lagging.
Selecting the closest gateway makes sense, please review more details in this article.
Also, you can decrease the amount of data by turning on Aggregation on the Connectivity Configuration window.