


See price more clearly in real time.
Compare plans to access deeper market visibility for price.
Trading Basics
April 25, 2026
Updated
Making Sense of Support and Resistance: How Price Barriers Impact Trading Decisions

You live in Japan and don’t know Japanese. If you are not open to learning
Japanese, will you be able to set up a profitable business? Trading isn’t
just about buying low and selling high; it’s about understanding the
language of the market.
Through this article, you will understand how support and resistance levels act as your biggest allies and let you talk with the market. Both these levels are psychological and technical, defining where the market may pause, reverse, or surge.
We’ll also guide you on how to act against overreliance and how advanced tools like Bookmap, uncover the secrets of market liquidity, volume, and real-time order flow. Let’s get started.
The Basics of Support and Resistance
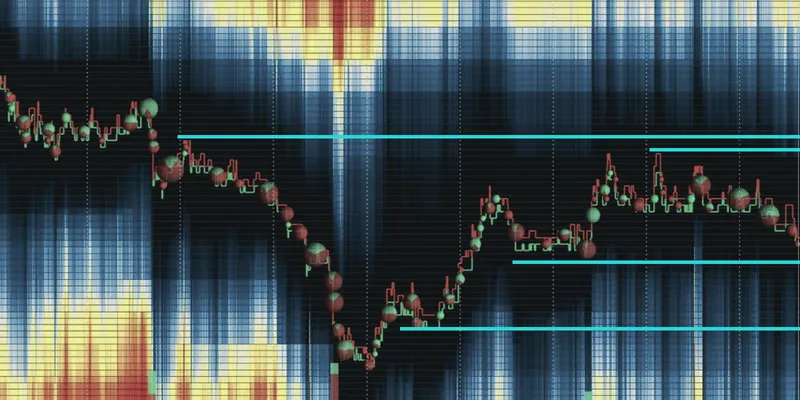
Support and resistance levels are associated with supply and demand dynamics. Both of them play a crucial role in determining price movements. See the table below:
|
Level |
Meaning |
Correlation with Demand |
Visualizing with Tools |
|
Support |
Support is a price level at which an asset tends to stop |
Support levels indicate a strong demand for the asset. |
Market analysis tools like Bookmap have features such
These visually represent support levels by using colors |
|
Resistance |
Resistance is a price level at which an asset tends to
|
Resistance levels indicate a strong supply of the asset. |
Similar to support, using Bookmap, you can visualize |
How These Levels Help Traders
The interaction between support and resistance levels is critical for traders. Here’s how they are commonly used:
-
Buy at Support:
-
Traders buy assets when they approach support levels
-
They believe that demand will push the price higher from that point.
-
-
Sell at Resistance:
-
Traders sell assets at resistance levels.
-
They believe the price to reverse due to the supply in that area.
-
What is Support?
As mentioned earlier, support refers to a specific price level on a stock, commodity, or any financial asset chart where a downtrend is expected to pause or even reverse due to a concentration of demand.
You can think of support as a safety net or floor.
-
Think of a tightrope walker walking on a high wire between two buildings.
-
They know that if they slip, there’s a safety net or a floor a few feet below to catch them.
-
This net or floor represents a level of support in the financial markets.
-
It’s the point at which the asset’s price tends to stop falling, just like the safety net stops the tightrope walker from falling too far.
Let’s understand through a hypothetical example.
Company X is currently trading at $50 per share. Over the past few months, the stock has been in a downtrend. However, at the $40 price level, it has consistently shown signs of support. Every time the price nears $40, it
either bounces back up or at least slows down its descent. This $40 price level can be considered a support level.
Why do buyers jump in at certain levels, creating support?
The psychology behind the support is driven by several factors, such as:
-
Perceived Value:
-
When the price of an asset drops to a certain level, buyers believe it’s a good deal.
-
They perceive the asset as undervalued, and this perception encourages them to buy.
-
-
Emotional Reactions:
-
Investors’ emotions play a significant role.
-
When an asset’s price falls and approaches a support level:
-
Fear of missing out (FOMO) or the desire to avoid losses drives more buyers to enter the market.
-
This surge in demand leads to creating a support level.
-
-
-
Stop-Loss Orders:
-
Many traders place stop-loss orders just below key support levels.
-
When these orders are triggered, they can lead to a surge in buying as traders try to limit their losses.
-
What is Resistance?
Resistance represents a specific price level on a stock, commodity, or any financial asset chart where a trend, typically an uptrend, can pause or reverse due to an abundance of selling activity.
Think of Resistance as a Ceiling or Barrier:
-
Resistance can be thought of as a price level that acts like a ceiling or barrier, preventing the asset’s price from rising
further. -
Just as the ceiling in a room stops you from moving upward, resistance is a point on a price chart where the price struggles to break through.
Let’s understand through a hypothetical example.
Company Y is trading at $60 per share. Over the past few months, the stock has been in an uptrend. However, at the $70 price level, it consistently shows signs of resistance. Whenever the price approaches $70, it tends to slow down or even reverse. This $70 price level is a resistance level.
Why do sellers jump in at certain levels, creating resistance?
The formation of resistance is influenced by
emotions and market psychology
, including:
-
Fear of Missing Out (FOMO):
-
When the price of an asset approaches a resistance level, traders fear missing out on potential gains.
-
Additionally, they also believe that the price has reached an overbought state.
-
This perception leads to hesitation and selling at this perceived “peak.”
-
-
Profit-Taking:
-
Investors who bought the asset at lower prices may decide to take profits when the price nears a resistance level.
-
This selling activity can act as a barrier to further price increases.
-
-
Technical Analysis:
-
Many traders and algorithms use technical analysis to identify resistance levels on price charts.
-
When these levels are reached, it can trigger automated sellingor profit-taking actions.
-
Identifying Support and Resistance Levels
Identifying support and resistance levels is crucial. Historical price levels help in determining these key levels. Let’s dive in further.
Trading Techniques Using Price Floors and Ceilings
Support and resistance are often described as price floors and price ceilings because they represent areas where supply and demand repeatedly influence price behavior.
Traders generally approach these levels in two ways:
Bounce Trading
- Buy near support when demand appears to be holding.
- Sell near resistance when supply appears to be absorbing buying pressure.
- Look for confirmation from volume, price action, or order flow before entering.
Breakout Trading
- Enter when price successfully moves beyond support or resistance.
- Look for expanding volume and continued participation after the breakout.
- Monitor whether the level holds after being broken.
The choice between bounce trading and breakout trading often depends on market conditions, volatility, and trader preference.
How to Use Historical Price Levels For Identification
Historical analysis is a three-step process. See the table below::
|
Steps |
Explanation |
|
Select a Time Frame |
Start by examining 6-month or 1-year historical price |
|
Observe Price Halts |
As you review the chart, pay close attention to price
These levels are characterized by multiple price touches
|
|
Strength in Frequency |
|
Psychological Levels
Supply and Demand Zones vs Traditional Support and Resistance
Many traders use the terms support and resistance levels and supply and demand zones interchangeably, but there are subtle differences.
- Support and resistance often focus on specific price levels.
- Supply and demand zones typically refer to broader areas where buying or selling activity previously became dominant.
- Both approaches attempt to identify locations where market participants may react again in the future.
Combining historical price behavior with volume and liquidity analysis can help traders determine which levels are most likely to remain relevant.
Psychological levels
play a significant role in trading and investing due to the human tendency to gravitate towards whole numbers and round figures. These levels often act as key points of interest in the financial markets. Let’s delve into their significance.
Why are Round Figures Significant?
-
People are naturally drawn to round numbers because they are easy to remember and provide a clear reference point.
-
At round figures, more traders buy, sell, or take other actions.
-
Round numbers have a strong emotional impact on traders. For example, a stock crossing $100 may trigger excitement, while failing to break $100 may induce fear or hesitation.
Let’s understand this significance practically using examples of various assets:
-
Bitcoin at $10,000:
-
Bitcoin’s price at $10,000 has been a significant psychological level.
-
Bitcoin has often faced strong resistance when nearing this level.
-
Traders and investors pay close attention to Bitcoin’s performance of around $10,000 due to the emotional impact of reaching a five-figure price.
-
When Bitcoin finally broke through $10,000, it triggered substantial buying interest, leading to further price
appreciation.
-
-
Stocks at $100:
-
In the stock market, $100 is a psychological milestone.
-
A stock approaching $100 may attract significant attention from traders and investors.
-
If the stock fails to break above $100, it can lead to profit-taking or selling pressure.
-
-
Gold at $1,000:
-
When gold prices approach $1,000, traders closely monitor its behavior.
-
Breaking above $1,000 often leads to increased interest in gold investments.
-
Trendlines and Moving Averages
Most traders use trendlines to identify trend direction and potential reversal points. Whereas, moving averages are adaptable indicators that help filter out price noise and identify trends. Let’s start by learning how to make a trendline.
Using Moving Averages for Confluence
Many traders combine horizontal support and resistance levels with moving averages.
When a moving average aligns with an existing support or resistance level, traders often refer to this as confluence.
Examples include:
- Support level aligning with a rising 50-day moving average
- Resistance level aligning with a declining moving average
- Horizontal levels overlapping with trendlines or other technical structures
Some traders also combine these areas with Fibonacci retracement levels to identify zones where multiple forms of analysis point to the same price region.
How To Draw Trendlines
Learn easily by reading this step-by-step guide:
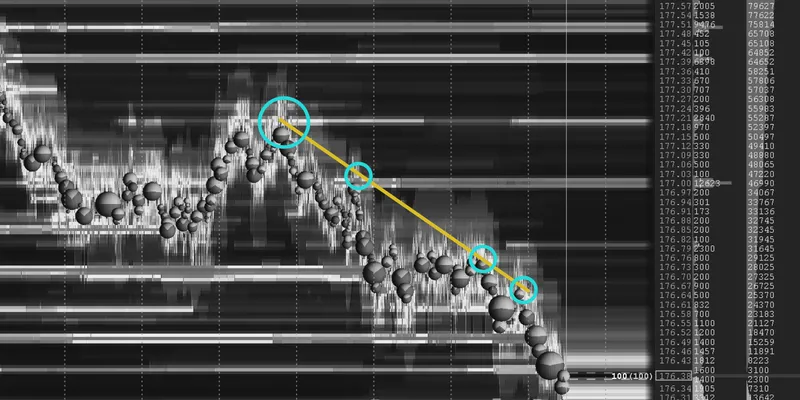
Step 1: Identify the Trend:
-
Start by identifying the trend you want to analyze.
-
It can be:
-
An uptrend (ascending)
-
A downtrend (descending), or
-
A sideways trend (horizontal).
-
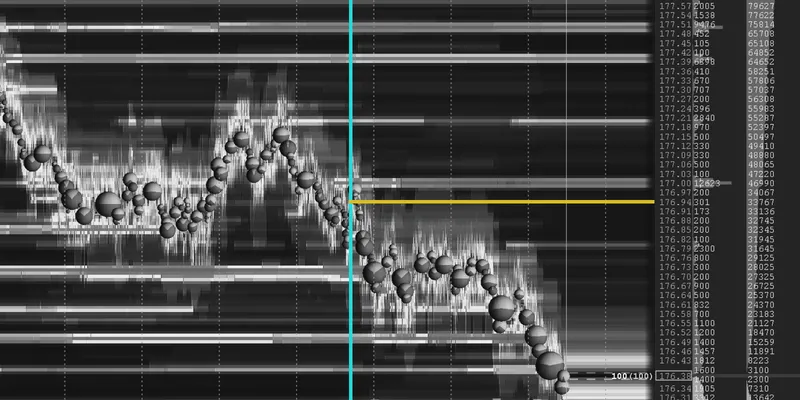
Step 2: Select Reference Points:
|
Type of Trend |
Reference Points |
|
For an uptrend |
Look for a series of higher lows and higher highs. |
|
For a downtrend |
Look for a sequence of lower highs and lower lows. |
|
For a sideways trend |
Observe whether the price moves within a range without a |
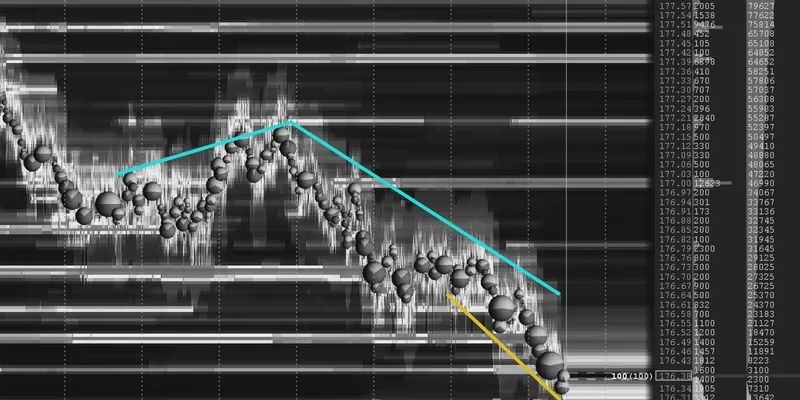
Step 3: Draw the Trendline:
-
Use a straight line or a trendline tool on your charting software to connect the points.
-
The points to connect will depend upon the type of trend you are observing.
-
See the table below:
|
Type of Trend |
Points to Connect |
|
Uptrend |
Connect the low points |
|
Downtrend |
Connect the high points |
|
Sideways Trend |
Connect the price peaks and troughs |
Step 4: Validate the Trendline:
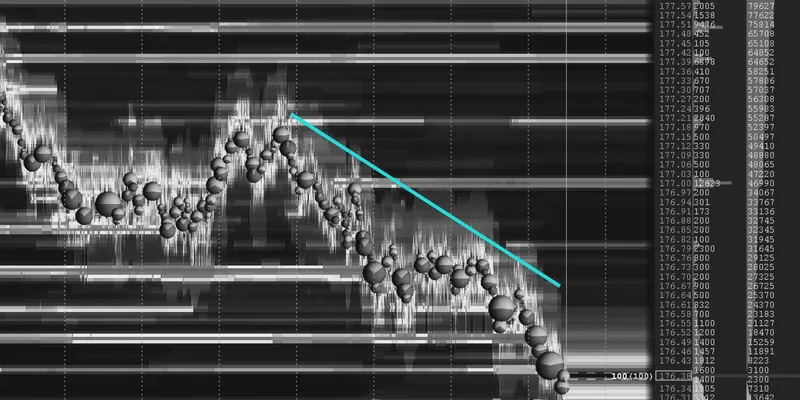
-
Ensure that the trendline touches multiple price points.
-
The more times the price respects the trendline without significant breaches, the stronger the trendline.
How to Calculate Moving Averages
Moving averages are calculated by adding the closing prices of an asset over a specific number of periods (e.g., days or hours) and then dividing by the number of periods.
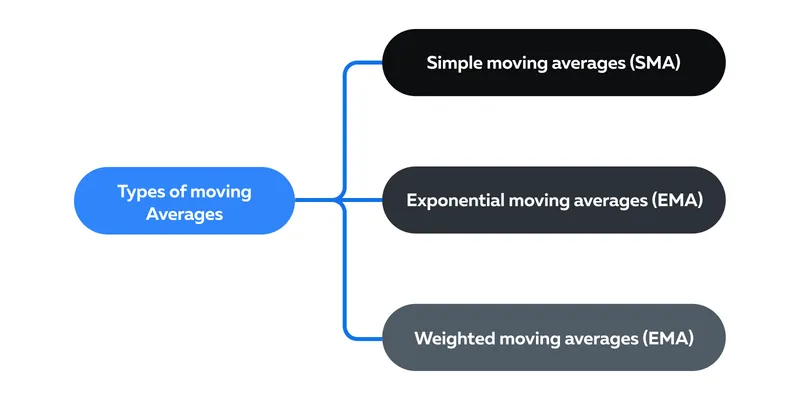
For example, a simple moving average (SMA) over 50 days is calculated by summing the closing prices of the last 50 days and dividing by 50.
What are the Different Types of Moving Averages?
Are Moving Averages Adaptable to Price Changes?
Moving averages adapt to price changes by continuously recalculating the average as new prices are added and old prices are dropped from the calculation window. This adaptability helps traders identify changes in trend direction.
For example:
|
Event |
Indication |
|
Short-term moving average (e.g., 50-day) crosses above a |
A potential uptrend |
|
Short-term moving average (e.g., 50-day) crosses below a |
A potential downtrend |
Trading Strategies Using Support and Resistance
Using support and resistance levels in trading strategies can be a powerful tool for traders and investors. Let’s study the popular bounce and break strategy.
The Bounce and Break Strategy
The Bounce and Break Strategy identifies:
-
Potential “bounces” off support
-
Potential “breaks” through resistance
Let’s break this down with a simple scenario:
Suppose Mr. A is analyzing the price of Stock XYZ, which has been on a steady uptrend. He notices that the price is approaching a well-established support level of $50. Here’s what Mr. A did before making a trading decision:
a) Historical Observation
-
Mr. A reviewed the past price behavior of Stock XYZ and saw that it had touched the $50 support level several times before.
-
Each time it touched this level, it bounced back up.
-
So, he concluded that the $50 level was a robust support for this stock.
b) Waiting for Confirmation
-
Mr. A wasn’t hasty. He looked for additional signs that supported the idea of a bounce.
-
He paid attention to candlestick patterns, especially those indicating a potential bullish reversal, and he also checked for volume confirmation.
c) Making a Trading Decision
-
After conducting his analysis, Mr. A decided to take a long (buy) position.
-
He believed that history might repeat itself, and the price would bounce off the $50 support level.
This strategy is essentially a straightforward yet effective way for traders seeking opportunities in the market.
How Important Is Confirmation?
There is a possibility of a false breakout in the Bounce and Break strategy. Even if a support level has been held multiple times in the past, there is no guarantee that it will do so in the future. Waiting for confirmation helps reduce the risk of entering a trade just before a support level breaks.
Also, it is always advised to rely on multiple confirmation signals before making a trade. Traders must not solely base their decision on the historical performance of a support level. The usage of technical analysis, volume data, and other indicators is paramount.
Identifying False Breakouts at Key Levels
False breakouts occur when price briefly moves beyond support or resistance before quickly reversing back into the previous range.
Common warning signs include:
- Weak volume during the breakout
- Immediate rejection after the breakout
- Lack of follow-through buying or selling
- Failure to hold above resistance or below support
Many traders wait for confirmation before entering breakout trades to reduce the risk of being caught in a false move.
Role Reversal Trades
Role reversal trades represent a price level that was:
-
Previously acting as resistance and
-
Now switches roles to become a support level, or vice versa.
Let’s understand the concept through this hypothetical scenario.
-
Bitcoin is trading below the $15,000 price level for an extended period.
-
This price level is acting as strong resistance.
-
In a recent rally, Bitcoin successfully broke through this resistance and surged to $20,000.
-
Now, Bitcoin has pulled back and is trading at around $15,000.
Why do Role Reversals Happen?
Here are some possible causes:
-
When an asset breaks through a significant resistance level, it triggers excitement and leads to increased buying interest and demand.
-
After the resistance is broken and the price pulls back to that level, traders who missed the initial breakout see it as a second chance.
-
Those who sold at the resistance level may experience “seller’s remorse” when they see the price continuing to rise after the breakout. Some of these sellers may buy back in at the prior resistance level, further supporting the idea that it now acts as a support.
Leverage Bookmap to Enhance S/R Analysis
Bookmap is a platform with advanced visualization features that can provide traders with a unique perspective on S/R zones and market liquidity. Here’s how Bookmap enhances S/R analysis:
a) Advanced Visualization with Heatmap:
Bookmap’s heatmap provides a real-time view of the order book. It shows the concentration of buy and sell orders at different price levels.
How do traders use the heatmap to quickly identify potential S/R zones?
-
The heatmap’s color coding helps traders visualize liquidity.
-
This makes it easier to spot areas with strong S/R potential.
b) Using Volume Dots:
Bookmap’s Volume Dots display real-time trading activity. These dots indicate when trades occur and the volume associated with each trade.
Let’s understand with an example.
-
Mr. X is analyzing Bitcoin’s price.
-
The price approached a support level of $40,000.
-
He noticed a cluster of large buy Volume Dots appearing just above $40,000.
-
This signals strong buying interest, reinforcing the strength of the support level.
Conversely, a cluster of large sell Volume Dots near a resistance level would suggest strong selling interest.
c) Historical Liquidity Analysis:
Bookmap also allows traders to review historical liquidity data. By observing the heatmap over time, traders can identify areas where high liquidity has persisted. These areas often correspond to strong S/R zones that are respected by the market.
d) Real-Time Order Flow Changes:
Bookmap displays real-time order flow changes. Traders can easily see:
-
When large orders enter the market or
-
When a previously strong S/R level experiences a sudden shift in liquidity.
Common Mistakes and How to Avoid Them
Traders must understand the common mistakes and learn how to avoid them. Here are the two most common mistakes that most traders make:
Mistake 1: Over-reliance on Support and Resistance
Let’s understand through a scenario.
-
A trader identifies a robust support level at $50 for a stock. They’re so confident in this support level that they place a substantial buy order, expecting a bounce.
-
However, the market sentiment changes due to unforeseen news, and the stock breaks below $50, leading to a significant loss for the trader.
How to Avoid It
-
Don’t treat Support and Resistance (S/R) levels as absolute or guaranteed, especially in volatile markets or when unforeseen events occur.
-
Always use other technical indicators and confirmations. Don’t rely solely on S/R levels.
-
Always use stop-loss orders to manage risk.
Mistake 2: Ignoring Volume
Let’s understand through a scenario.
-
A trader observes a cryptocurrency approaching a resistance level at $10,000.
-
The price appears to break above this resistance, and the trader enters a long position.
-
However, they fail to notice that the break occurred with very low trading volume.
-
The price quickly reverses, and the trader experiences losses.
How to Avoid It
-
Always pay attention to trading volume when analyzing S/R breaks.
-
Combine volume analysis with other technical indicators to confirm S/R breaks.
Conclusion
Support and Resistance (S/R) levels can certainly help you understand the language of the market. Be it your business venture in Japan, or your trades in the market, you can enjoy both only after making informed decisions.
S/R levels provide critical insights into market dynamics and help traders identify potential reversal points. Advanced market analysis tools, like Bookmap, enhance S/R analysis through heatmaps, volume dots, display of
real-time order flow changes, and more.
Ready to experience the power of advanced visualization in identifying Support and Resistance zones? Dive deeper and gain an edge in your trading decisions with Bookmap.
Sign up now
and elevate your trading strategy.
FAQ
What volume indicators best confirm a bounce off a support level?
Many traders look for increasing trading volume, aggressive buying activity, or strong participation as price approaches support. Higher volume can help confirm that buyers are actively defending the level.
Should stop-loss orders be placed exactly at support or resistance?
Many traders avoid placing stops directly at obvious levels because these areas are frequently tested. Instead, they often place stops beyond the level while managing overall position size appropriately.
How many times must a price level be tested to be considered valid?
There is no universal rule. Generally, the more times a level is tested and respected without breaking, the more attention traders tend to give it.
Are you interested in trading dynamic moving levels or fixed horizontal zones?
Some traders focus on fixed support and resistance levels, while others rely more heavily on dynamic levels such as moving averages or trendlines. Many combine both approaches.
Do you prefer trading the breakout of a barrier or the bounce away from it?
Breakout traders look for price acceptance beyond key levels, while bounce traders seek reversals from established support or resistance. Each approach requires different confirmation techniques and risk management rules.
What asset class are you analyzing for these structural levels?
Support and resistance concepts apply across stocks, futures, forex, cryptocurrencies, and commodities, although liquidity and volatility characteristics vary between markets.
Are you applying this technique to short-term scalping or long-term swing positions?
Support and resistance can be used across multiple timeframes. Short-term traders often focus on intraday levels, while swing traders may prioritize daily, weekly, or even multi-year structural zones.
Sign Up Now
Latest Articles