Trading Journal
Web Trading Journal overview
Welcome to the Trading Journal System for Bookmap! This platform is specifically designed to help Bookmap users keep detailed records of their trades, analyze their performance, and improve their trading strategies. Here’s a quick guide to get you started.
Key features
- Journals: Think of journals as digital notebooks. Each journal can contain records of trades for different instruments, making it easier to organize and classify your trades.
- Trade Records: You can record each trade's details, including entry and exit dates, instrument, size, entry and exit prices, profit/loss, trade type (buy/sell), and notes.
- Filters and Time Range: You can easily find specific trades by applying filters for time ranges, instruments, and journals. This allows you to focus on the data that matters most to you.
- Statistics and Analytics: View overall statistics such as total profit/loss, win/loss ratio, average win/loss, and more. The P&L chart provides a visual representation of your trading performance over time.
- Journal sharing: Share your journal with other journal users to get valuable insights and feedback on your trading performance.
To start using the Bookmap Trading Journal please follow the steps from here
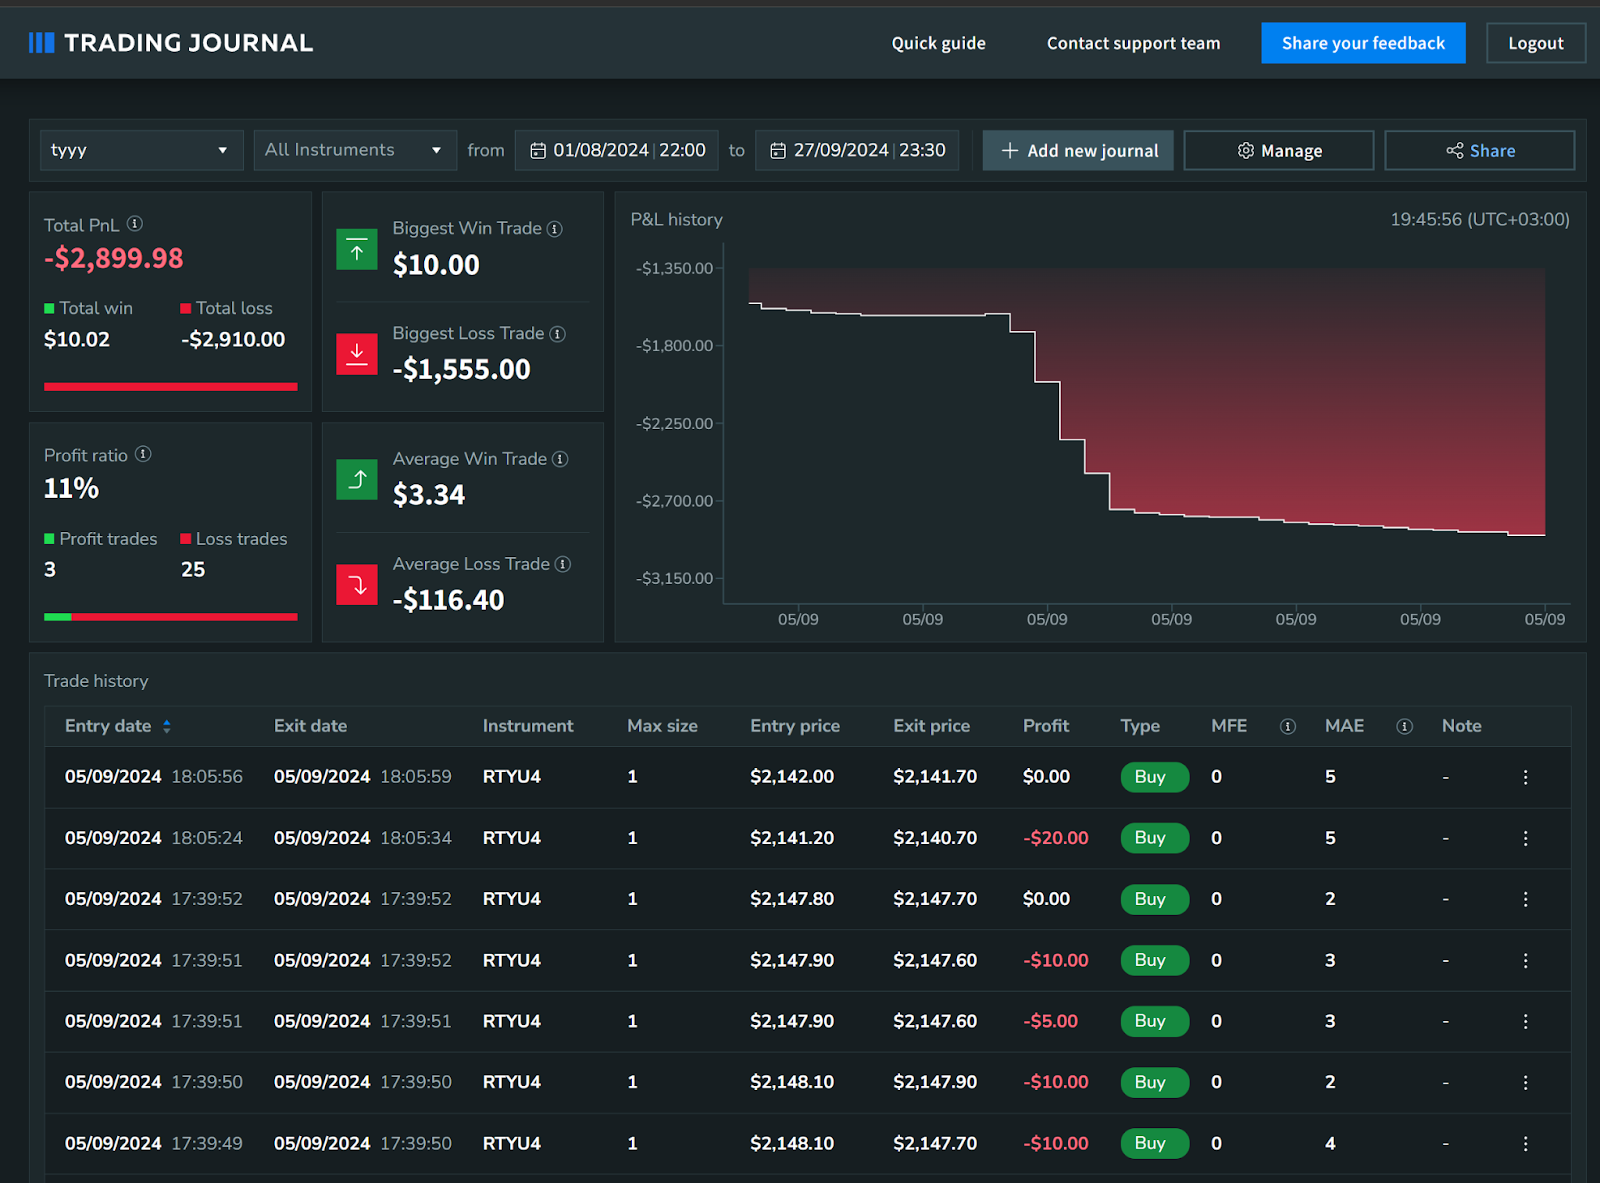
Above you can see an example of what your Trading Journal may look like. Let’s talk about the main components that you see:
Filters section
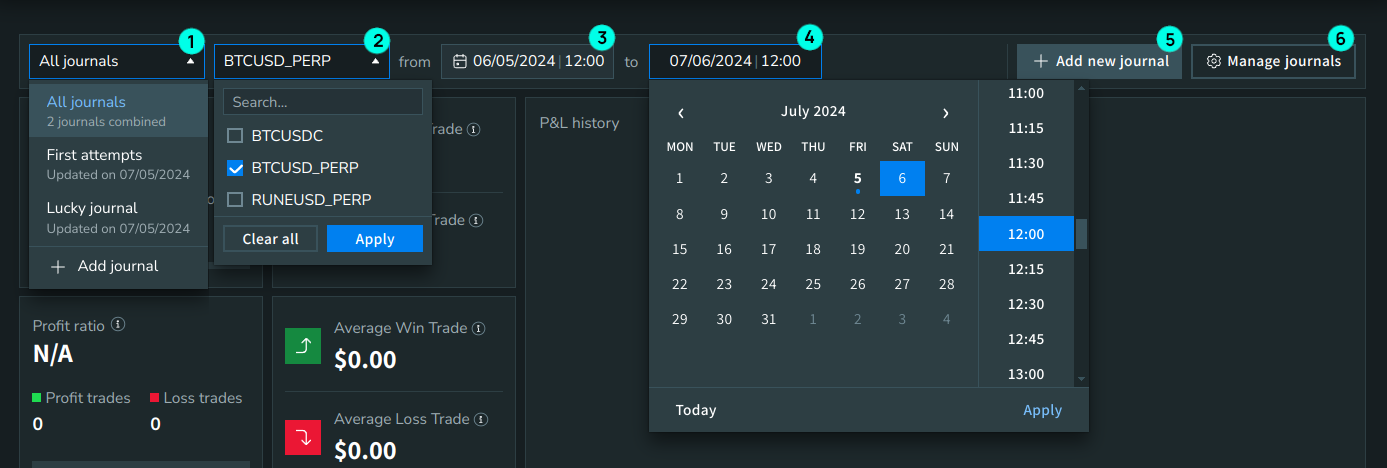
The filters panel allows you to refine your search with various filters:
- Journals filter: Select the journal you want to see, or choose the “All journals” option if you want to see information from all journals.
- Instruments filter: To filter by instruments, select instruments and click “Apply”. Click “Clear all” to reset the filter.
- Start date filter: Select a start date & time and click “Apply”. Today's date is marked with a blue dot.
- End date filter: Select the end date and time, then click “Apply”. Today's date is marked with a blue dot.
- Add journal button: Opens a modal to create a new journal.
- Manage journals buttons: Opens the “Manage journals” page.
Trading statistics
In the top left corner are your statistics. The values displayed are based on the filters that you choose in the header. You can find here the biggest win, total win and average win trade size during your specified period, and the same applies to loss trades. You can also see your profit ratio for the configured period, which equals the ratio between the number of win and loss trades. Note: This doesn’t give you a ratio between wins and losses sizes, it compares only the ratio between the number of individual trades.
P&L chart
In the top right corner, you can see the chart of your P&L. The chart is evaluated according to your specified filters. The profit-and-loss chart is built based on trades that were made during your configured period. Along the x-axis are timestamps, but be aware that dots on the chart won’t have the precise x-coordinate according to the timestamp when you close the position. Instead, it just maintains the general order of how your P&L changed over the specified period.
For example, let’s imagine you made 3 trades on the 1st of January; the first you closed at 11:22, the second at 11:23 and the third one at 22:00. If you look at the Trading Journal P&L chart for the 1st of January, then the timestamp delta on the chart between first and second trade will be the same as between second and third trade.
Trades history
Below those elements are your actual trades. Your Trading Journal filters are also applied here. Trades are displayed according to the filters that you have specified. You will see only the trades whose exit dates are within the chosen time period, and they are sorted by this value in descending order (the newest orders at the top, the oldest at the bottom). Here are descriptions for all of the columns:
- Entry date - the date and time when you opened the position
- Exit date - the date and time when you closed the position completely
- Instrument - the instrument you are trading
- Max size - the maximum size of the position of the particular trade
- Entry price - the average price of the position
- Exit price - the last price by which the position was closed
- Profit - the profit from this position
- Type - the position type i.e. buy or sell
- MFE - the Maximum Favourable Excursion - this measures the maximum potential profit gained during a trade before the trade is closed
- MAE - the Maximum Adverse Excursion - this measures the maximum potential loss incurred during a trade before the trade is closed (the difference between the entry price and the lowest/highest market price during the trade)
- Note - you can add or update a text comment on any particular trade. Please be aware that notes in your Journal are not synchronized with any notes made in the Bookmap Trading Statistics add-on
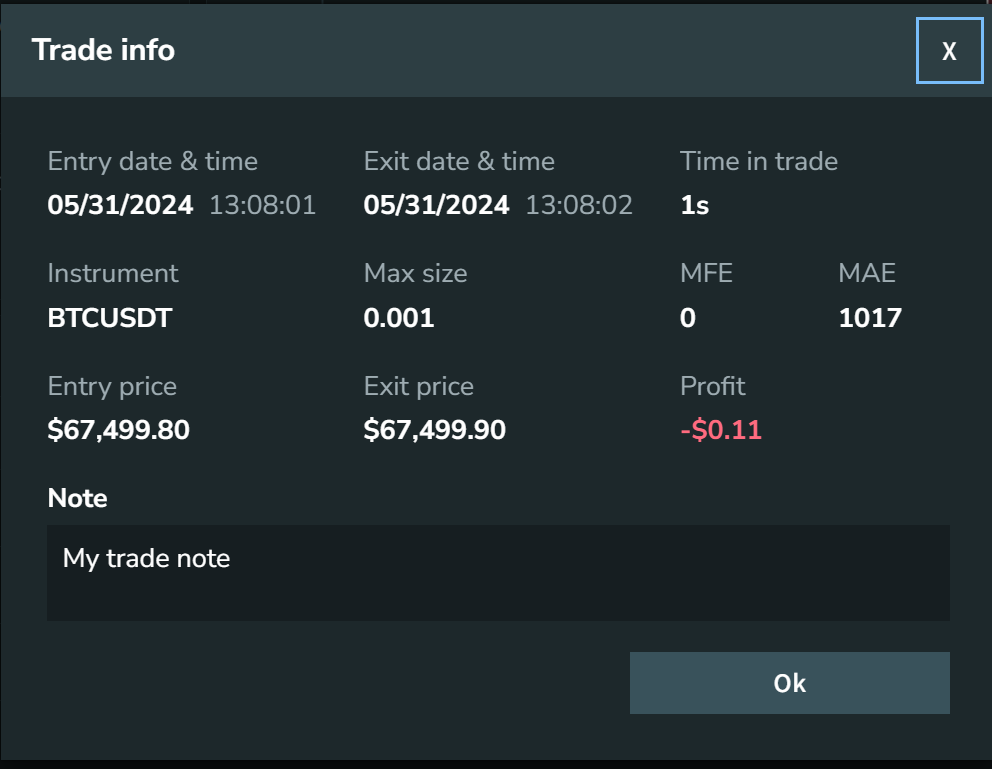
Also, you can click on any trade to see detailed information in the pop-up:
Journals management
Creating new journals
-
Go to journal.bookmap.com and log in there
-
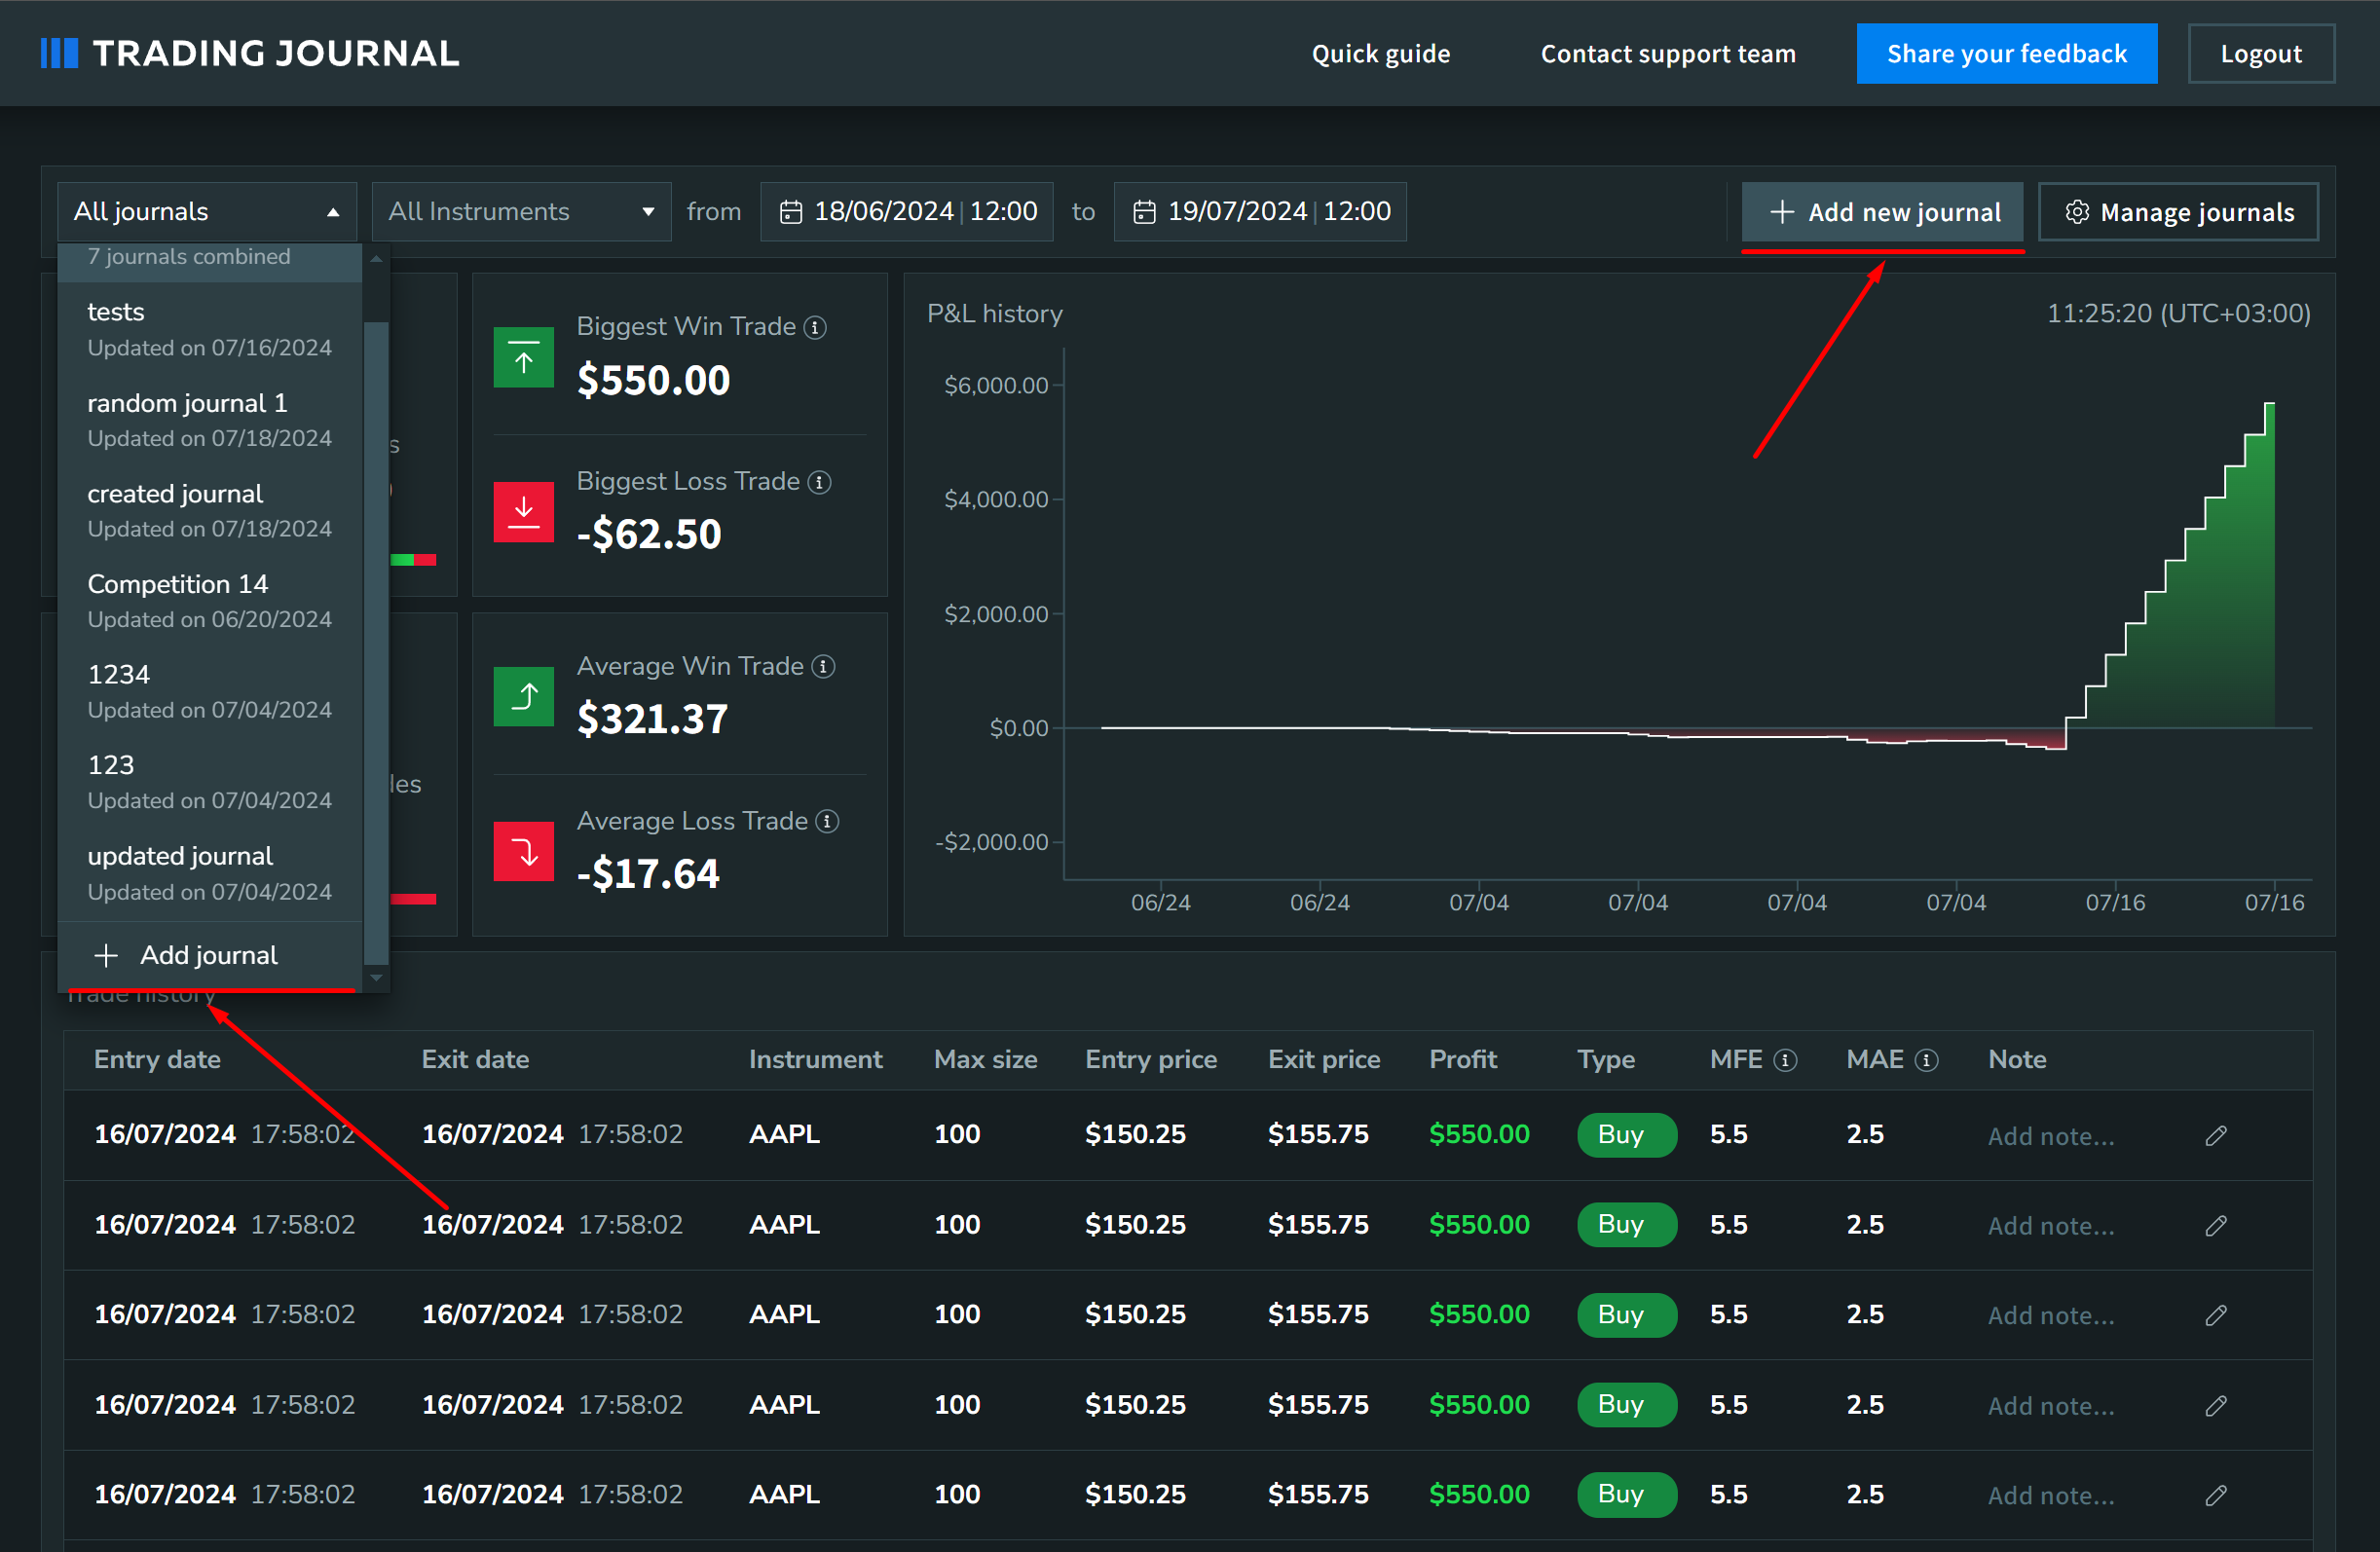
Click on the “+ Add new journal” in the filters section or in your journals dropdown as shown in the screenshot
-
After the pop-up is shown, you can create a new journal. “Journal name” and “Journal type” are mandatory parameters. Each journal name must be unique. You can change both of those parameters in the future
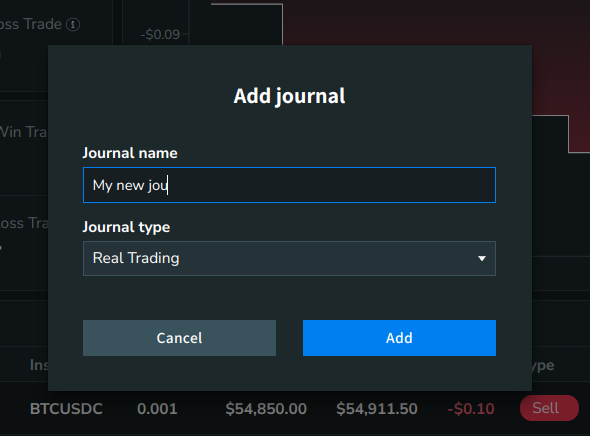
Explanation of types: you can create two different types of journals: with “Real Trading” and “Simulation”. The difference is that “Real Trading” journals won’t be available in the Trading Statistics add-on if you launch Bookmap in the Simulation mode Note: you can change this type in the future, but with only those 2 types. It means that you won’t be able to change the type “Competition” -> “Simulation” or “Real Trading” and vice versa. Only “Simulation” -> “Real Trading” and “Real Trading” -> “Simulation” are available
-
To start using your new journal you should go back to Bookmap
-
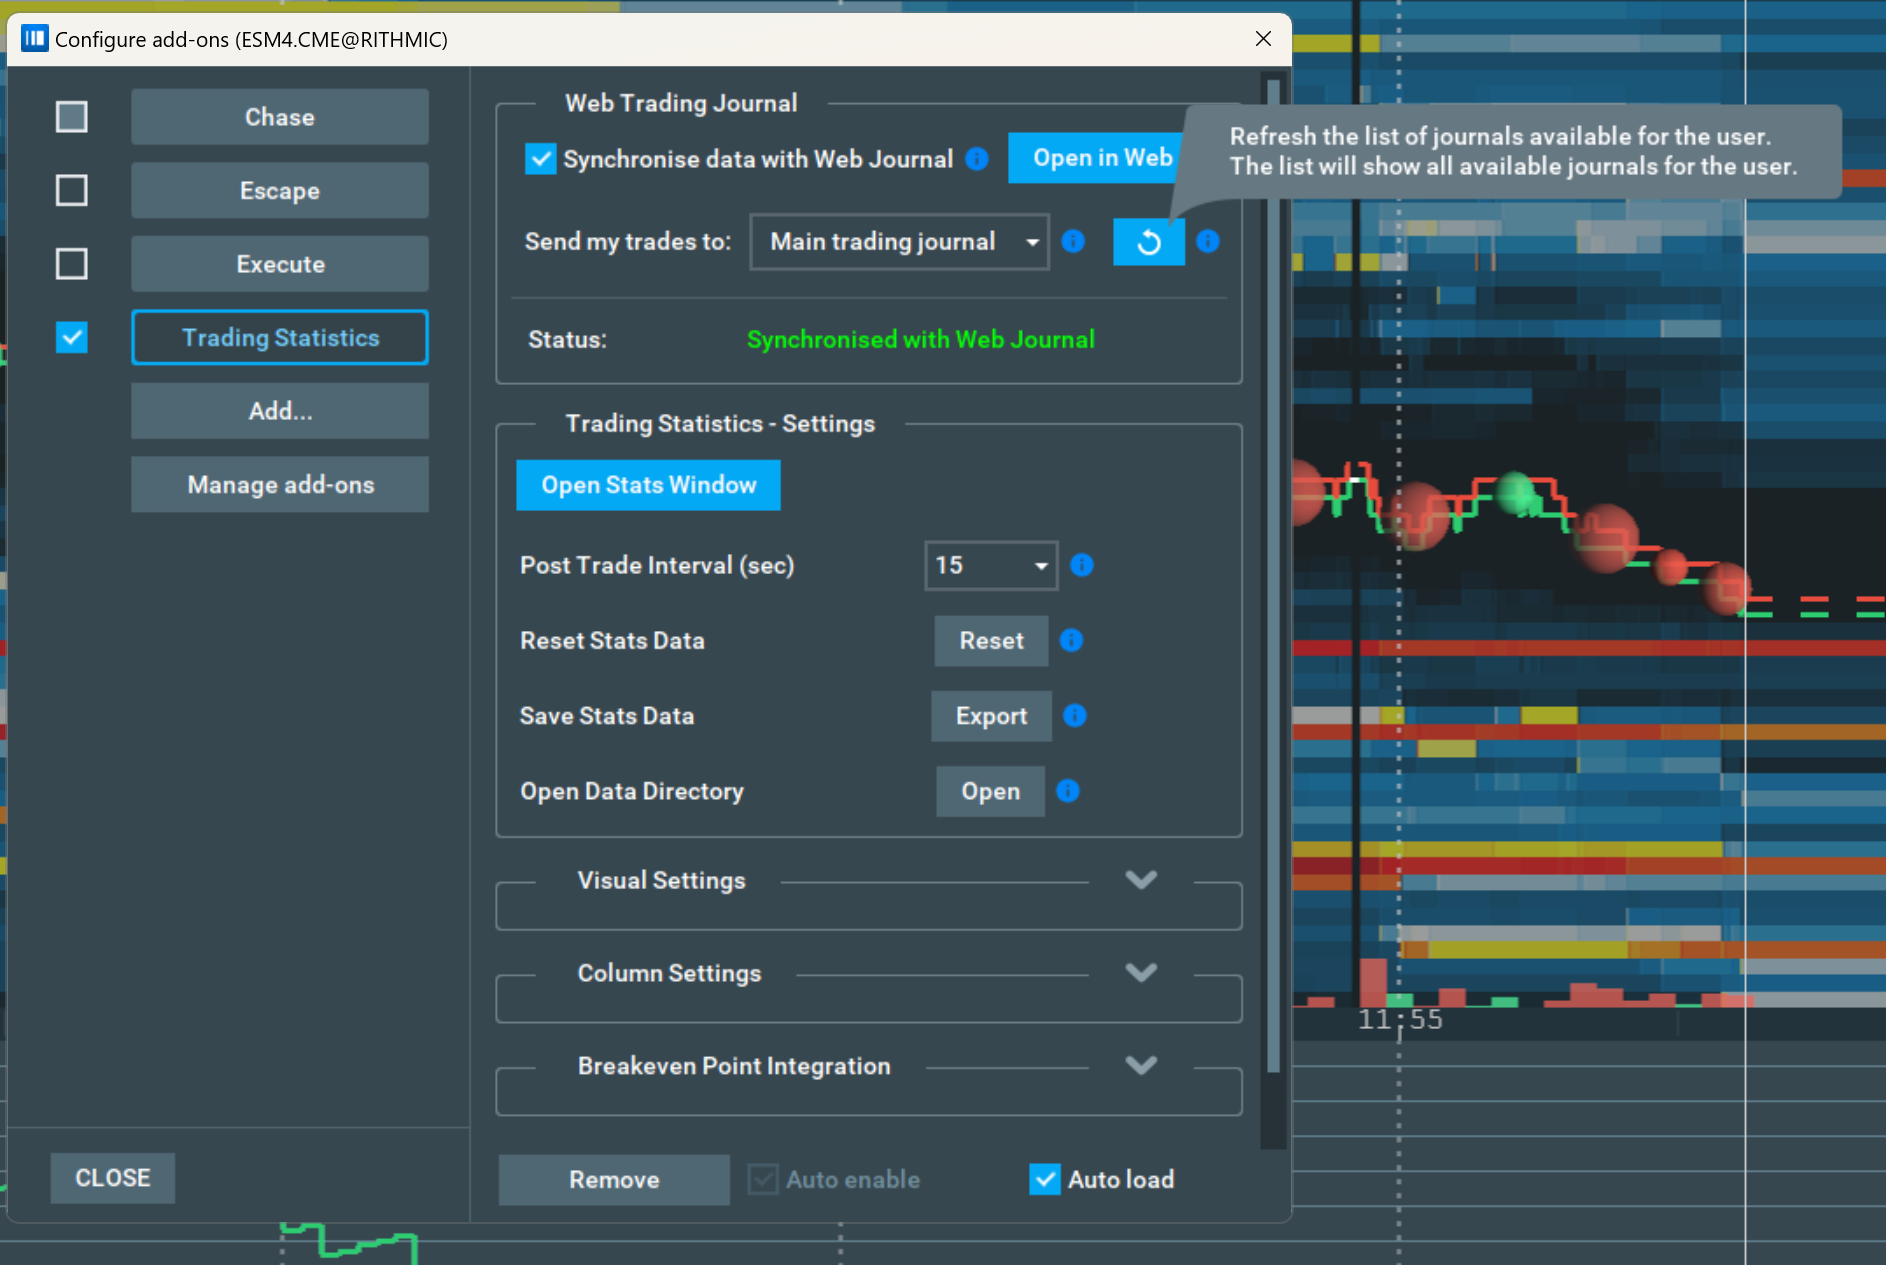
Open the "Configure add-ons" window (you can do it by clicking "Settings" -> "Configure add-ons")
-
Open the "Trading statistics" add-on
-
Click on the "Refresh" icon besides your selected journal
-
Your New Journal should appear in the dropdown
Update your journal
-
Go to journal.bookmap.com and log in there
-
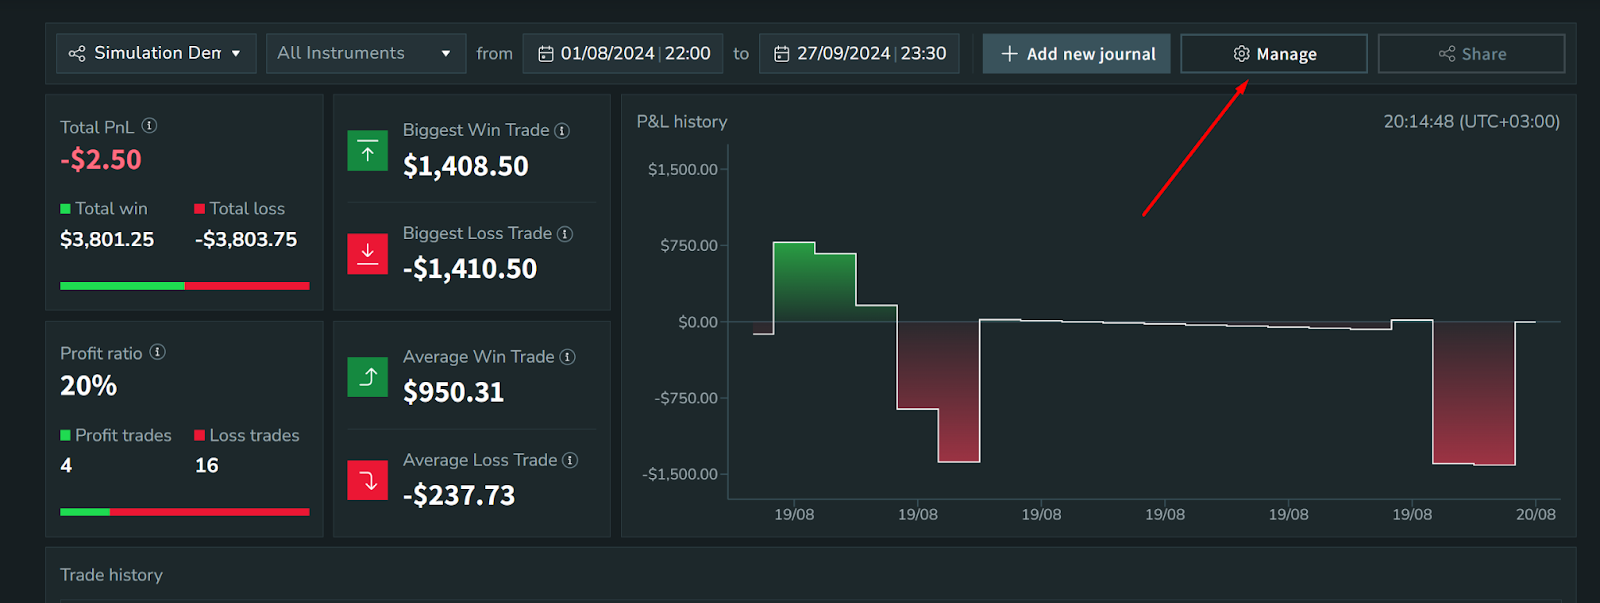
Click on the “Manage journals” button
-
Click on the 3-dot icon in the row of the desired journal and select "Edit" to edit the journal

-
After the pop-up appears you can change the name or type of your journal
Note: you can delete the description if it was present by leaving the text area empty. You can’t delete the name. You can’t specify the name if you already have the same name in another journal.
Delete a journal
-
Go to journal.bookmap.com and log in there
-
Click on the “Manage journals” button

-
Click on the 3-dot icon in the row of the desired journal and select "Remove" to delete the journal

-
Confirm the deletion in the shown pop-up
Note: journal deletion will also delete all trade data within this journal. This change can’t be reverted!
Share journal
-
Go to journal.bookmap.com and log in there
-
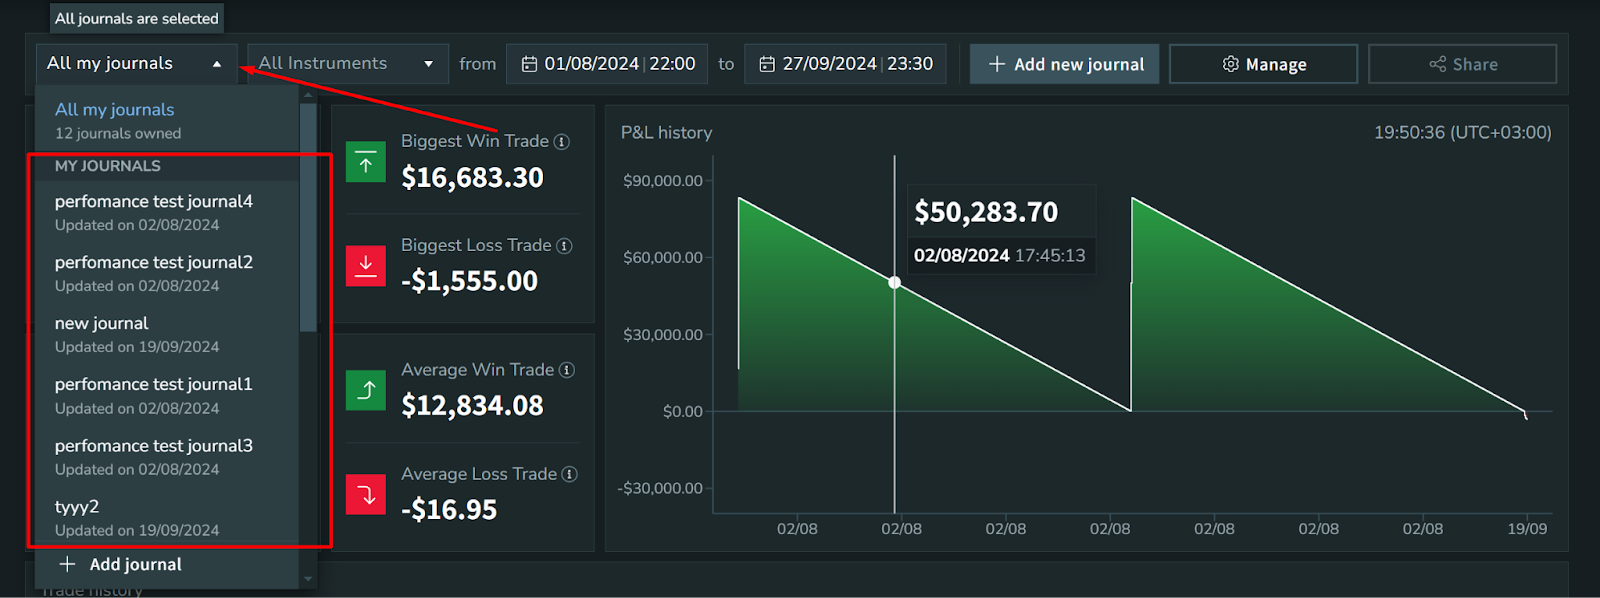
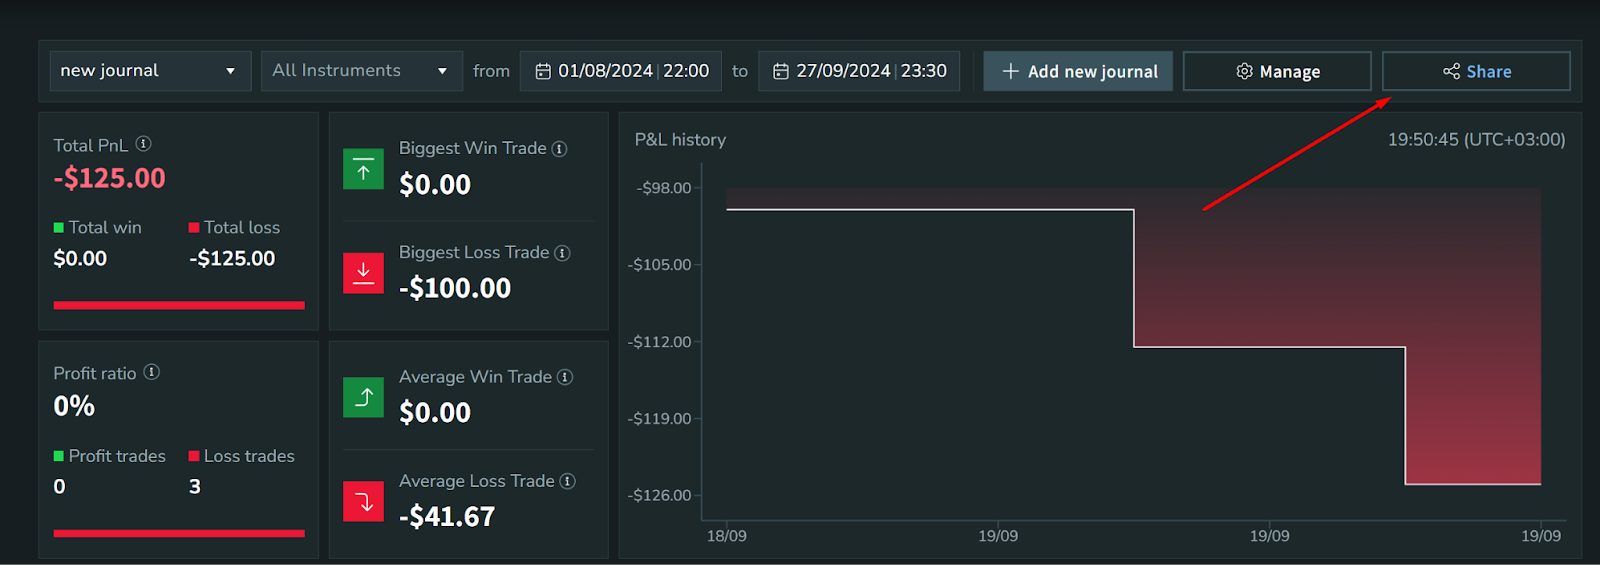
Select the journal you want to share under the journals dropdown
-
After you select your desired journal, the “Share” button will appear
-
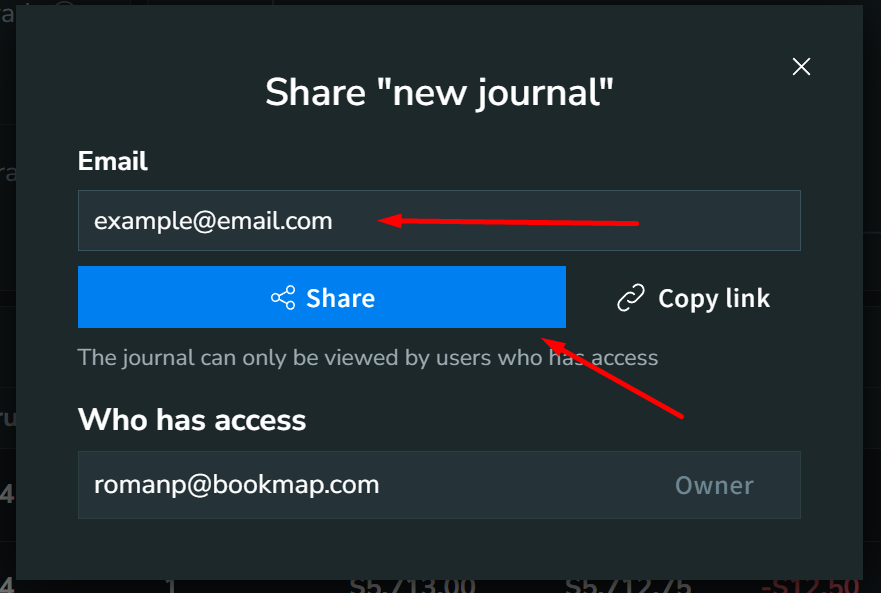
Enter the user email with whom you want to share the journal and click “Share”. Also, you can click “Copy link” and send it to the user directly. (Note: link will work only for users with whom you have shared the journal)
Access the shared journal
-
You can access the journal that was shared with you via the link that was sent to you by the journal owner
-
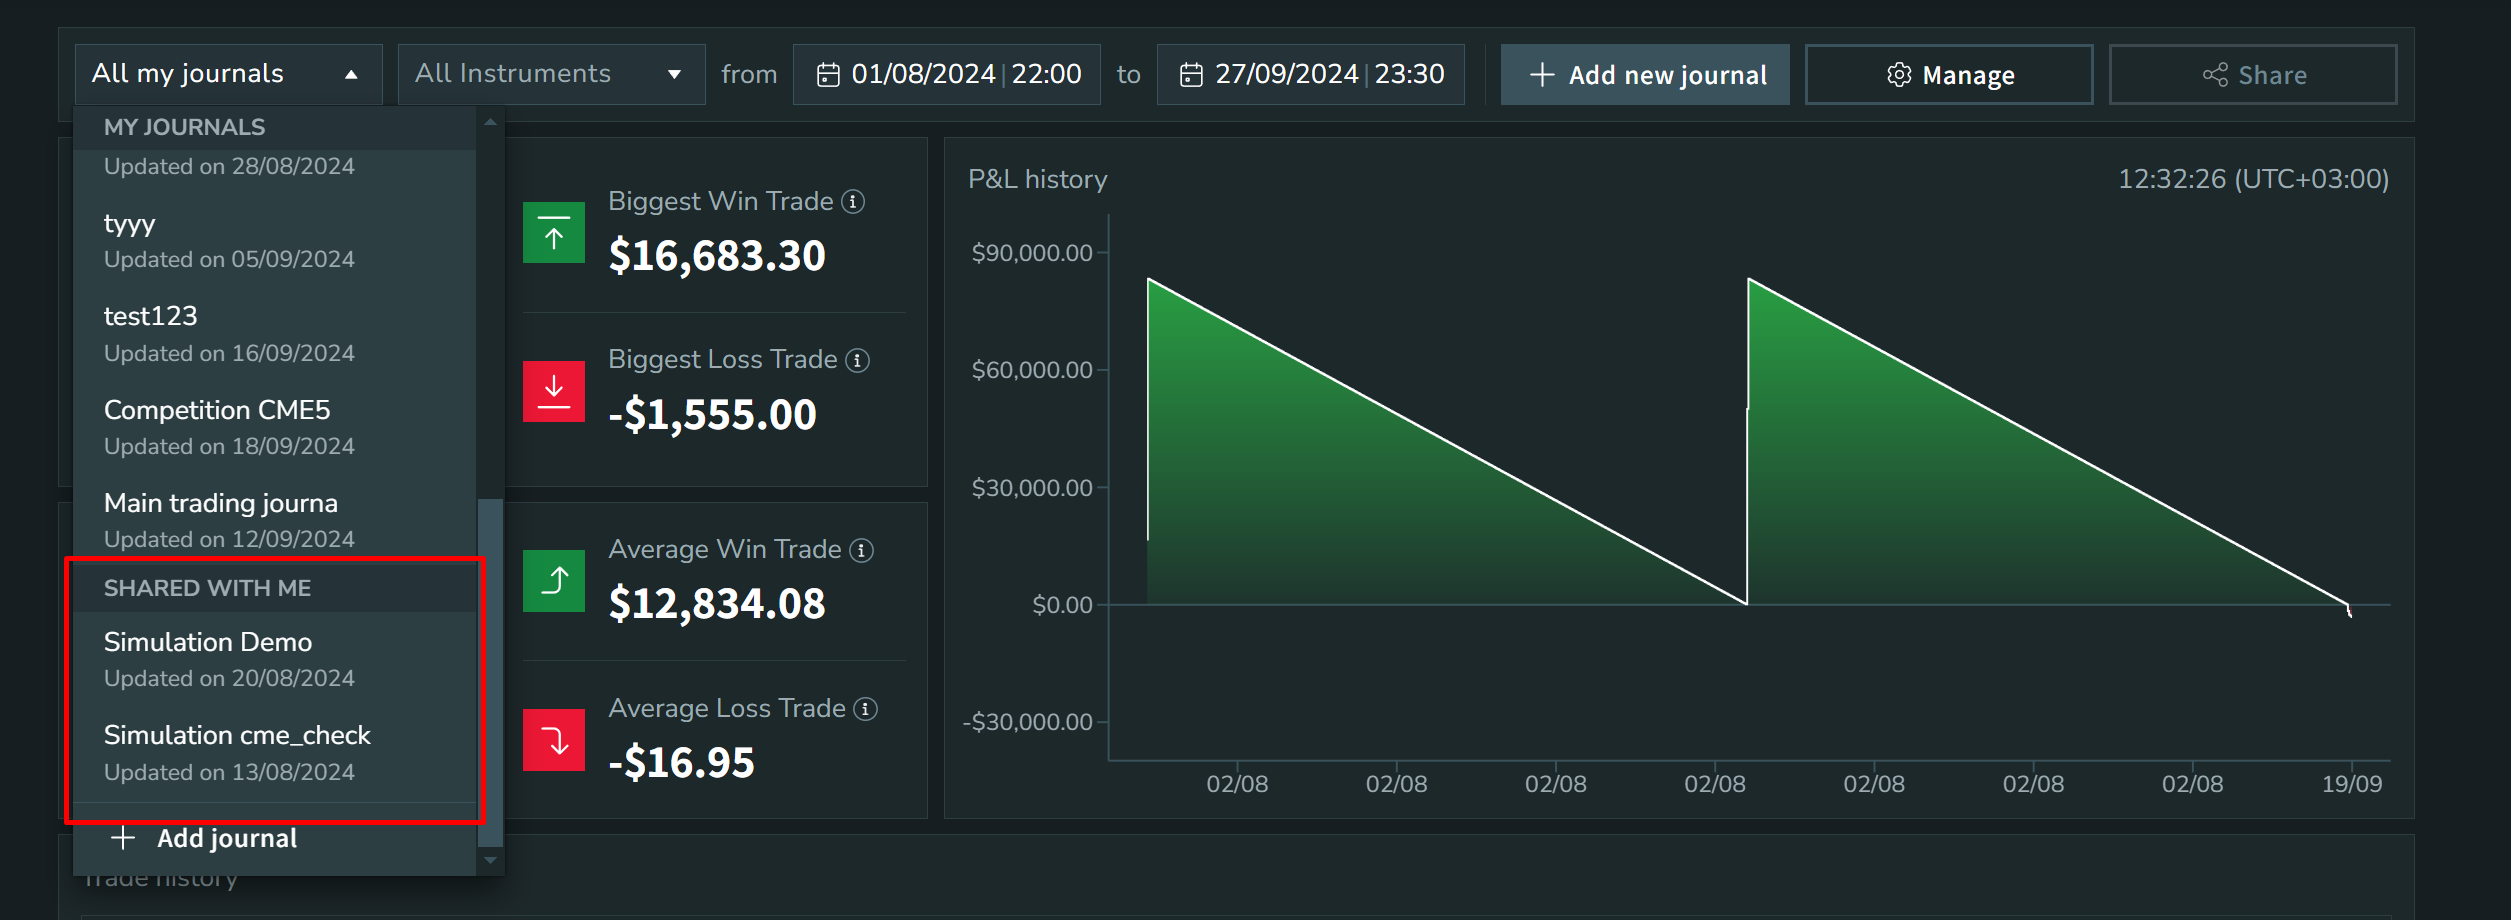
Or you can go to journal.bookmap.com, login, and view the shared journal
-
Under the “Journals” dropdown, scroll to the bottom and select a desired journal
Revoke access to shared journal
-
Go to journal.bookmap.com and log in there
-
Go to “Manage journals”

-
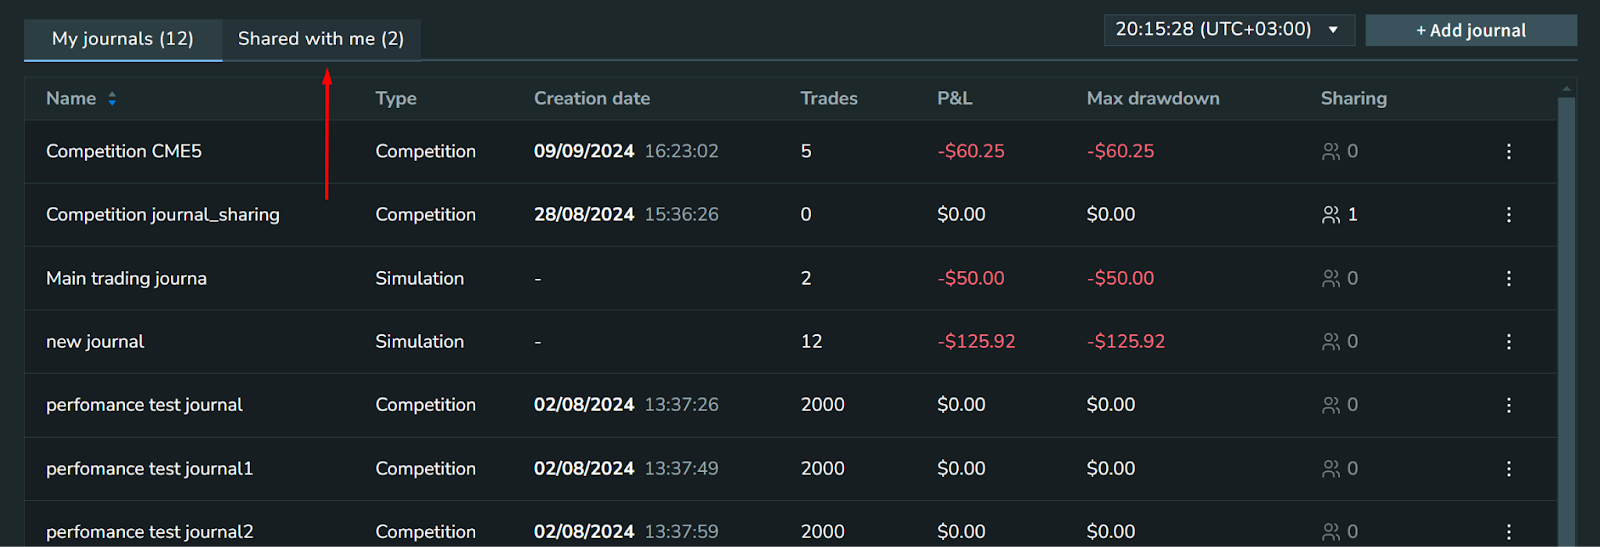
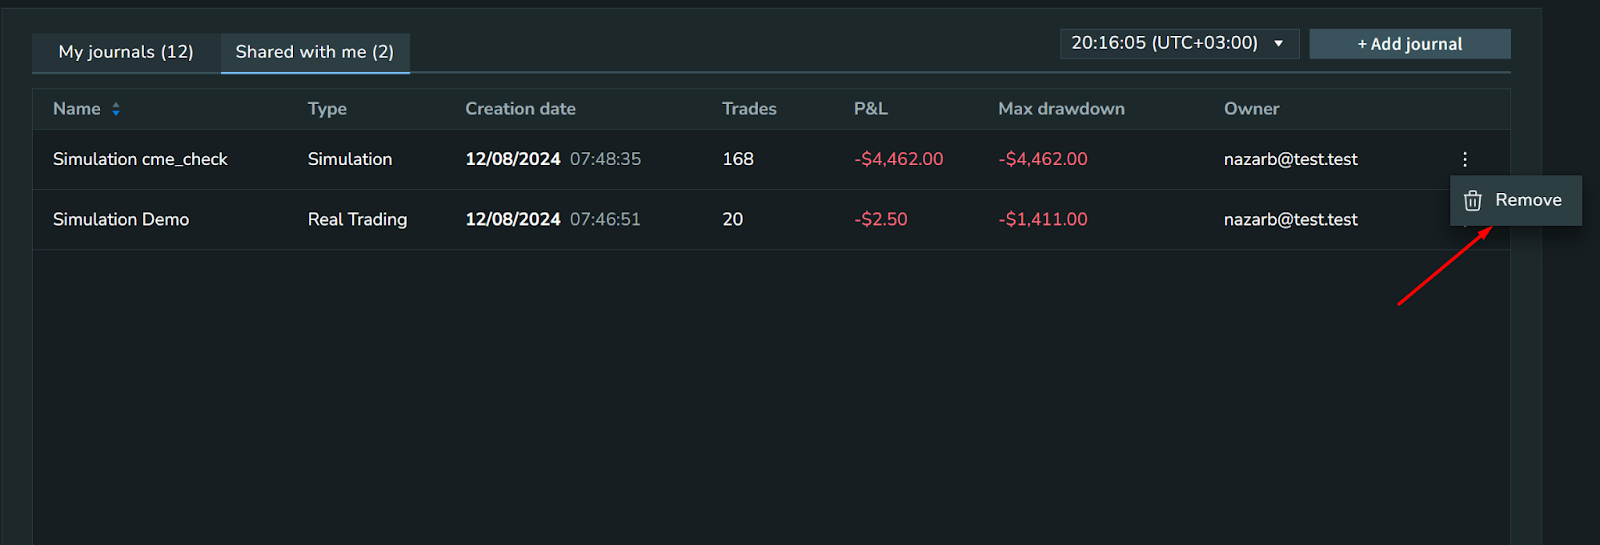
Click “Shared with me” tab
-
Click on the 3 dots, and “Remove”. This action will remove this journal from your shared journals list
Filter by journal
-
Open the "Configure add-ons" window
-
Enable the "Trading statistics" add-on
-
Notice that by default all your trades are sent to a journal named "Main trading journal" (you can change this name on the website if you wish)
-
Configure the add-on to send your data to a specific journal by specifying it from the "Send my trades to:" dropdown (you can create a new journal by clicking on the "+ Add journal" button and going through the steps of creating a journal above)
Note: the last selected journal will persist on every Bookmap restart, you don’t need to configure every time when you start using the add-on, instead the latest selected journal will be used
-
Go to journal.bookmap.com
-
Under the "All journals" dropdown you can choose one or multiple journals. Only statistics from specified journals will be shown
How to install
-
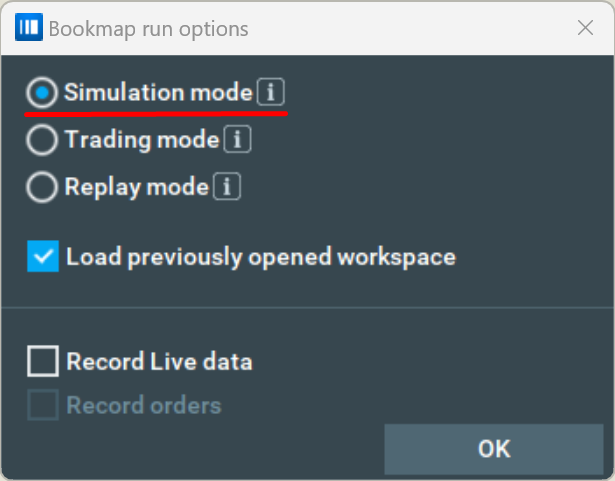
Launch Bookmap in Simulation mode
-
Download the add-on via the add-on manager by clicking the "Manage add-ons" button. To learn more about add-on installation you can visit the "Add-on Manager" page
-
Find the Trading Statistics add-on amongst other add-ons and click "Install"
-
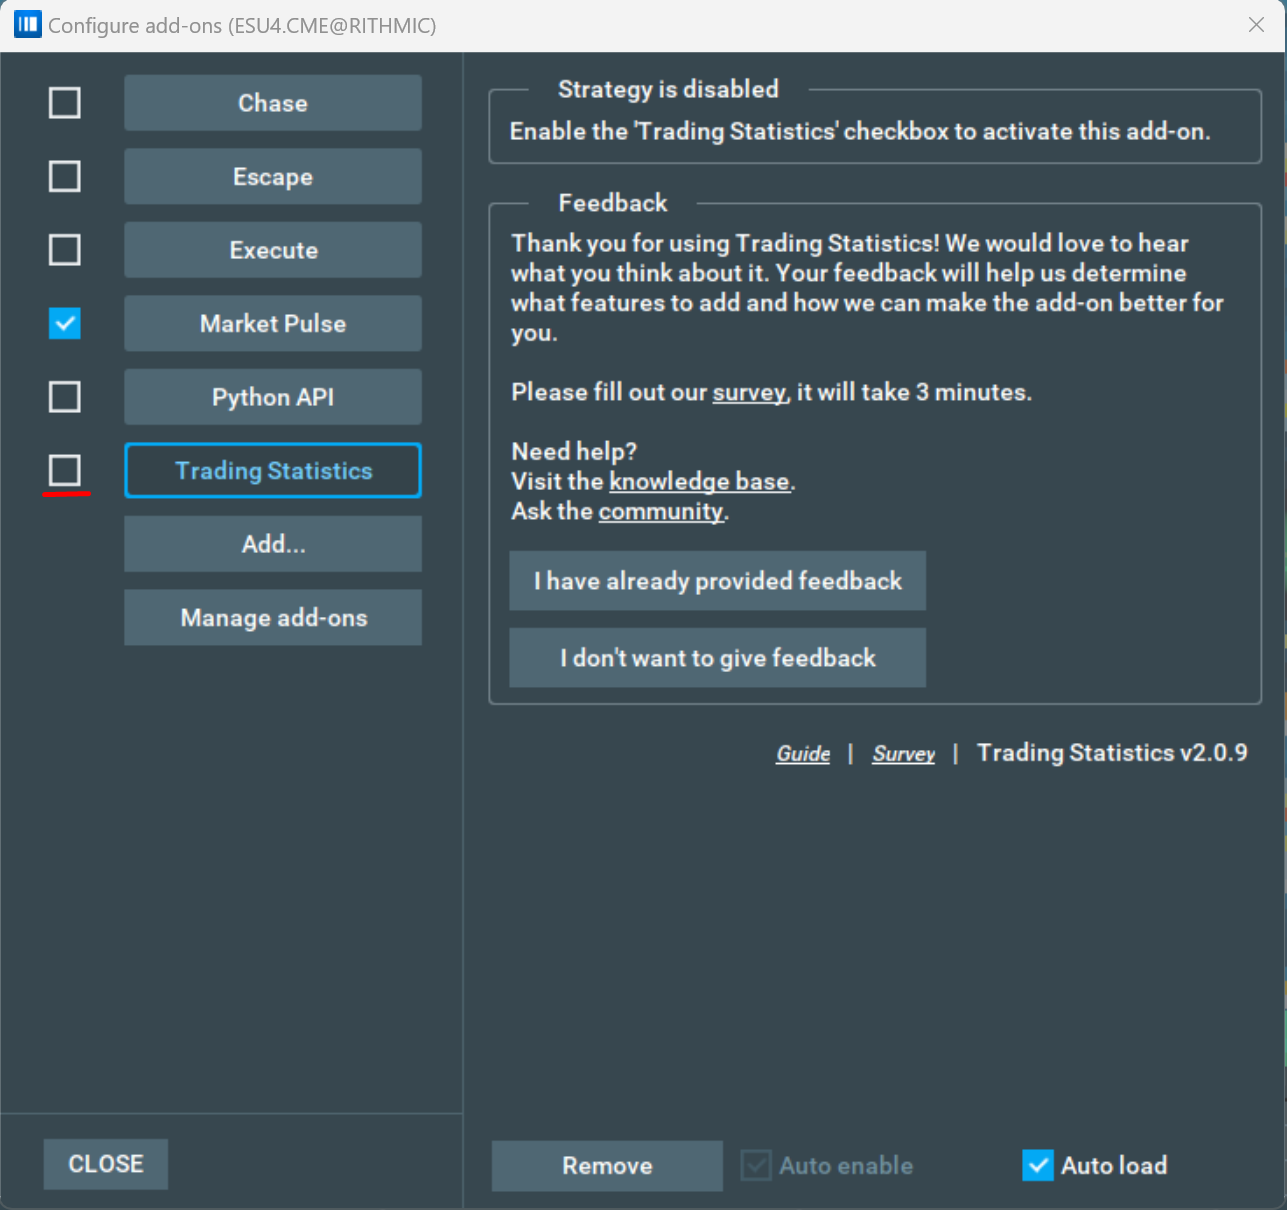
Enable the add-on on your "configure add-ons" page
-
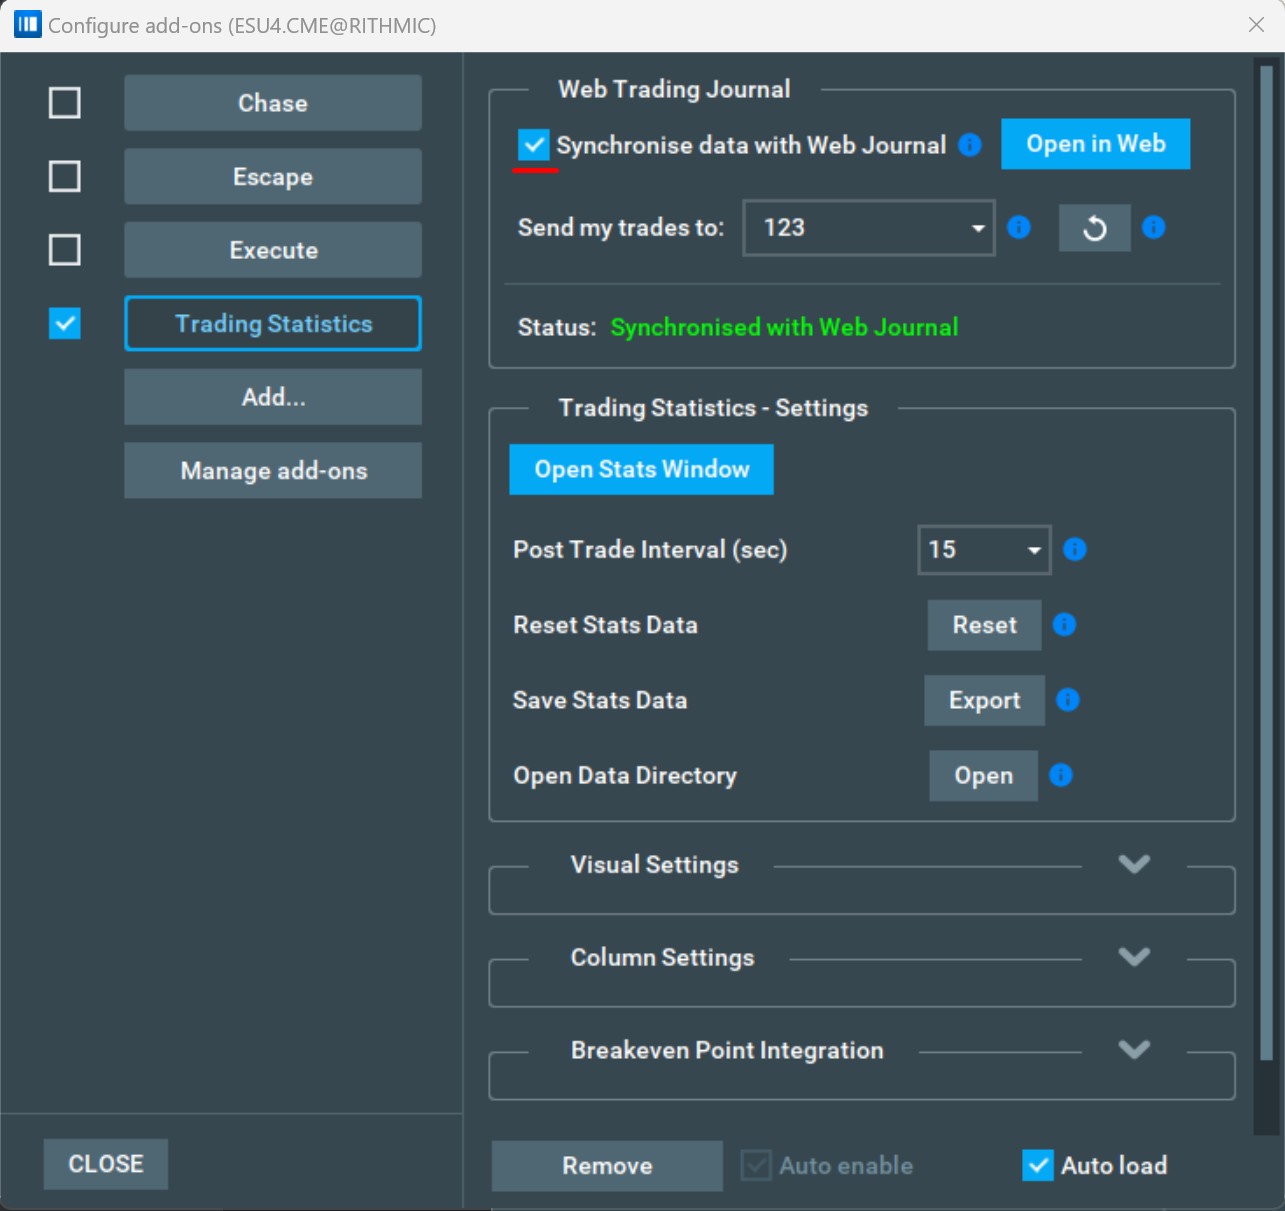
If your "Synchronise data with Web Journal" checkbox is enabled, the add-on will send data to the server and keep your local app synchronized with the online Trading Journal (Please note that the checkbox is enabled by default)
-
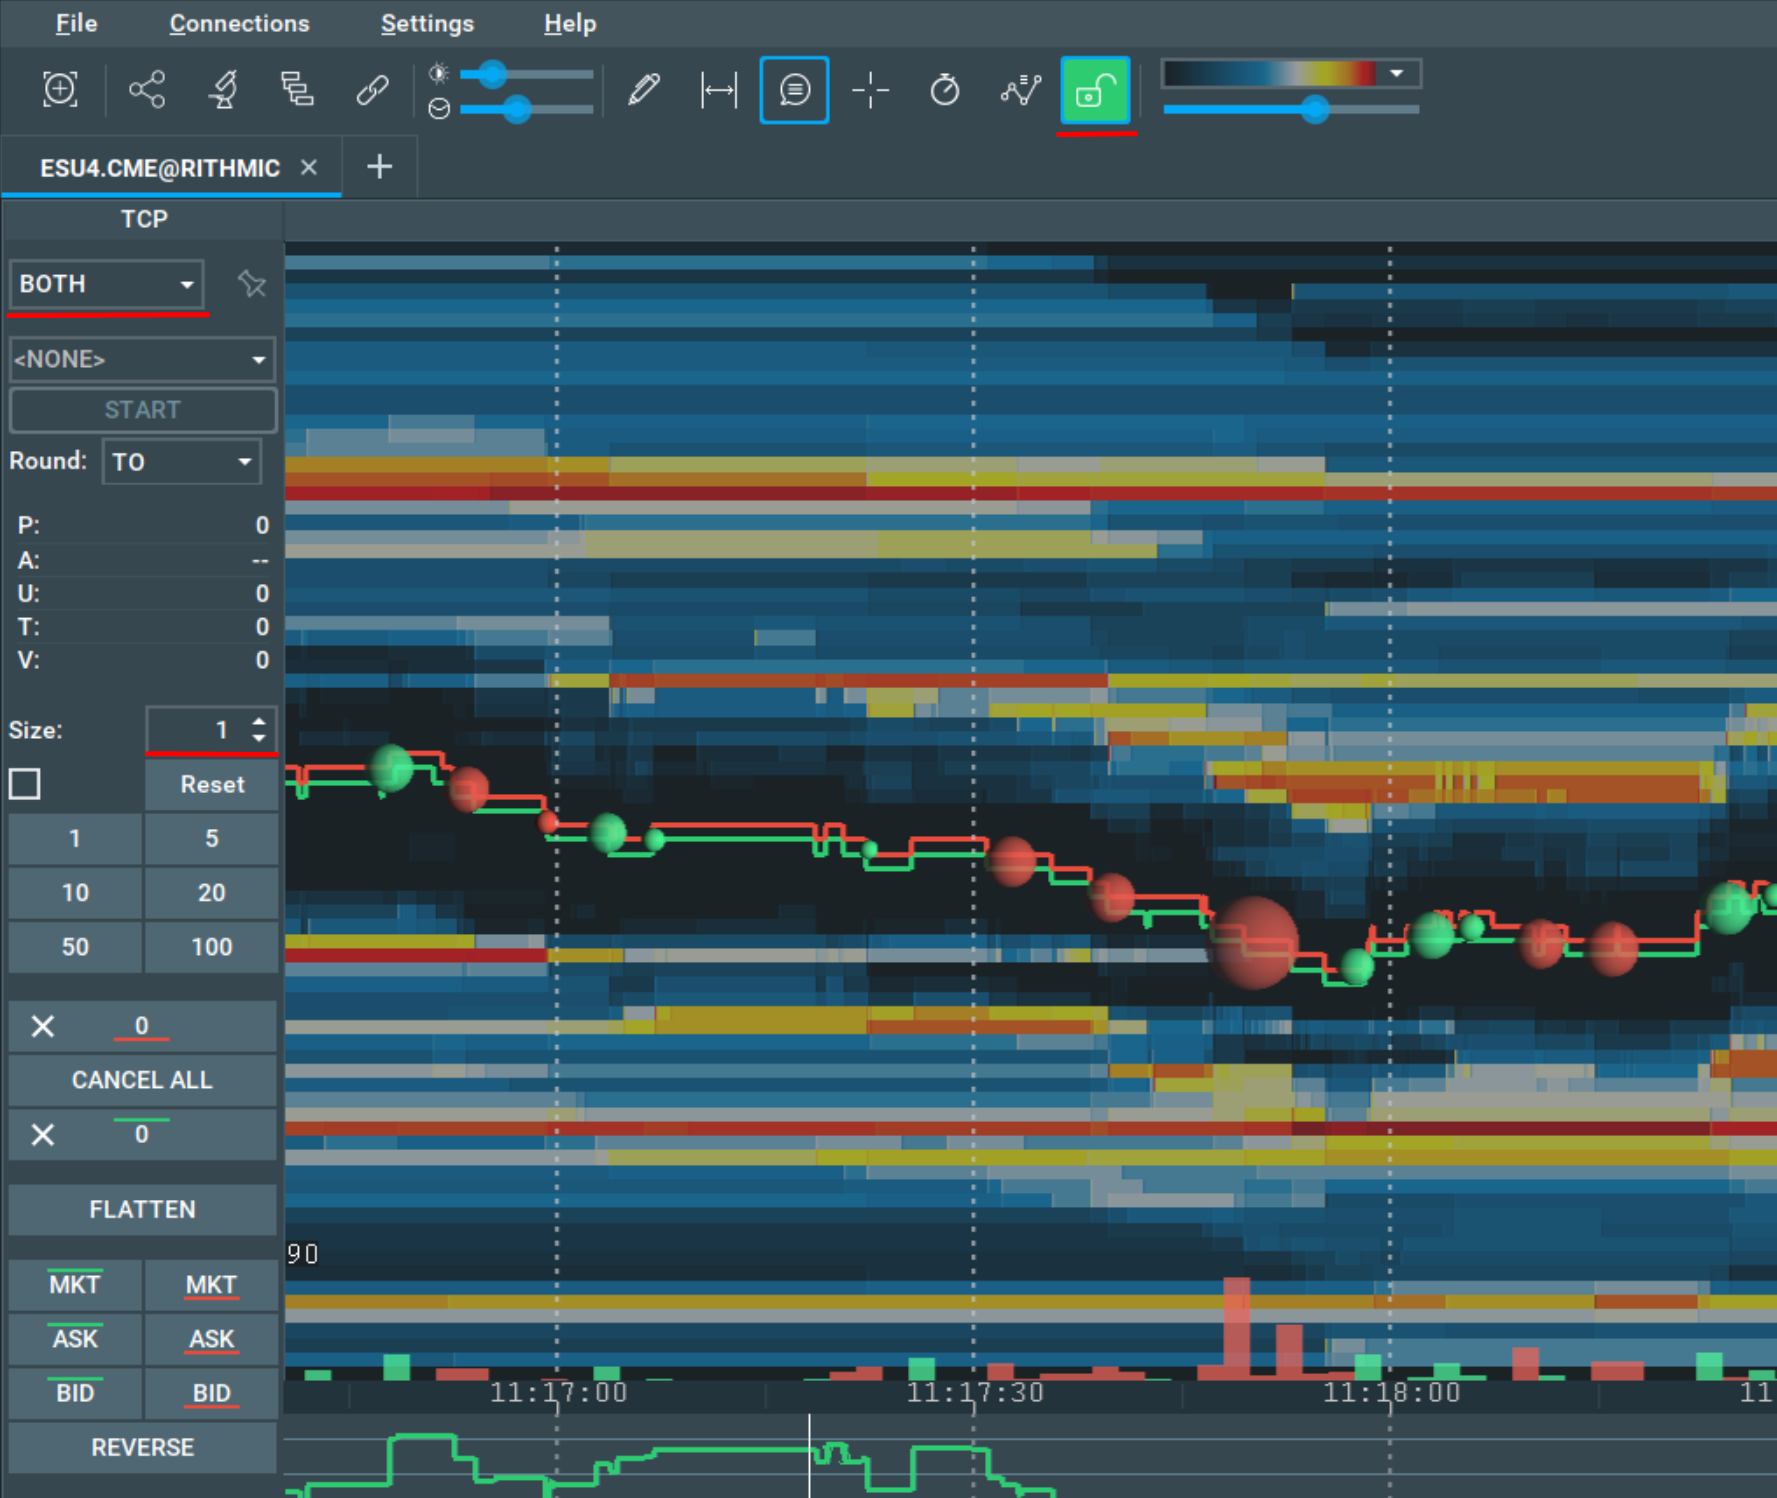
Next, enable trading via Bookmap and set up your order size
-
Perform a trade and then get flat
-
Go to the Trading Journal page: journal.bookmap.com
-
Log in to Trading Journal or register with your Bookmap license key
-
Check your trading results

FAQ
- I don’t receive trades from the add-on. What should I do?
- Make sure that you have the status “Synchronized with web journal” in the add-on. If the status is different and clicking on the “Synchronize data with Web Journal” doesn’t help, then you can try to click on the “Remove” button in the add-ons menu and afterwards add “Trading statistics” again.
- It could be that you didn’t specify the filters correctly, so please make sure you have:
- Correct time ranges - your trade’s exit time must be within the specified time range
- Correct journal(s) - you are checking the correct journal(s) looking for a trade that you made
- Correct alias(es) - you are checking the correct alias(es) looking for a trade that you made
- Can I use a Web trading journal without a Trading Statistics add-on and vice versa?
- Your Web trading journal won’t receive any trades from Bookmap without a connection via Trading Statistics. If you want only to analyse your data at some point - it is not necessary to have Bookmap opened with a Trading Statistics add-on enabled.
- You can use the Trading Statistics add-on without a Web trading journal. In this case, you can use all of the Trading Statistics functionality, but your trades won’t be stored in the cloud and you won’t be able to use functionality that allows you to split your trades into the different journals.
- Why are my open positions not displayed in the Web trading journal?
- The Web trading journal stores only closed positions. It doesn’t store open orders or open positions.
If you have any other questions, please contact us at support@bookmap.com